Adding a Template
There are two types of Data Template that can be created. We can create a Data Template for a single thing and Gateway Data Template for multiple things.
You can add a data template by
- Clicking Data Templates in the Manage dropdown (for the first time)
- Clicking Add New Template on the top-right corner of the Data Template page (after you have added a data template)
- Clicking Add Data Template from the Create (
 ) menu present on the title pane.
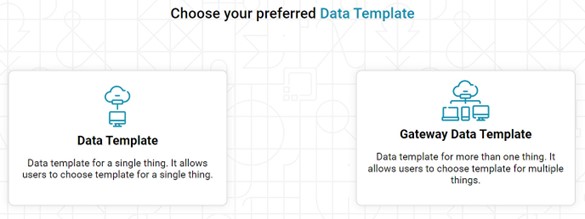
Adding a Data Template
- Select the Data Template Tile and Click on Create button.
- Enter a suitable Name for the data template. This field is mandatory.
- Add a suitable Description of the data template.
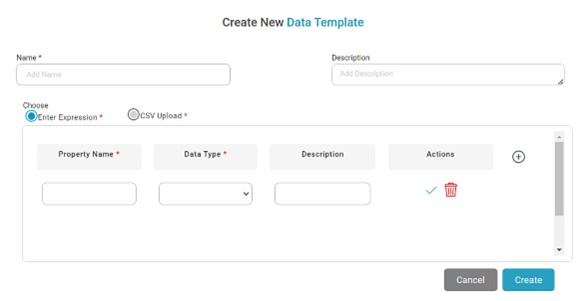
- Select the desired radio button.
- Enter Expression
- Enter the Property Name you want to add to the data template.
- Select the Data Type of the Property from the dropdown. The three available data types are Number, Boolean, and String. For example, a property like temperature will be of number data type.
- Enter a Description of the added Property.
- From the Action tile, Click the Save icon (
 ) to save the Property. Click on Add Row (
  ) to add the next Property. You can add as many properties as you want.
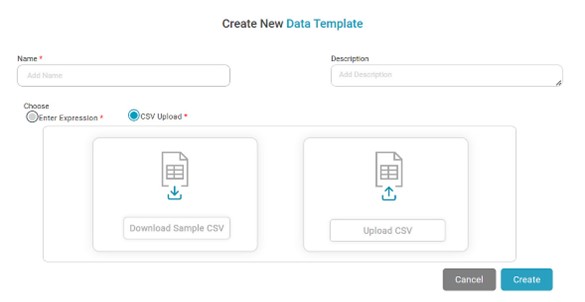
- CSV Upload
Using CSV you can build multiple expressions.

NoteYou can upload CSV files with valid headers only. Click on Download Sample File to download the sample CSV file with the valid headers.
Select the CSV upload radio button to upload the CSV file.
Click on the Upload CSV button and select the CSV file.
- After you have added the required properties, click Create. The data template is created and added to the list on the Data Templates page.
- The Created data template appears in the format DT_Datatemplatename. Where DT represents the Data template. It helps to understand whether the data is coming from a single thing or multiple things.
The table below describes the various icons on the Create New Data Template page for performing various operations on the added properties.
Icon | Name | Click to |
Edit Icon | Edit a property | |
Delete Icon | Delete a property | |
Add Icon | Add a New Row | |
Clear All Icon | Clear the Row |
Adding a Gateway Data Template
To add a Gateway Data Template
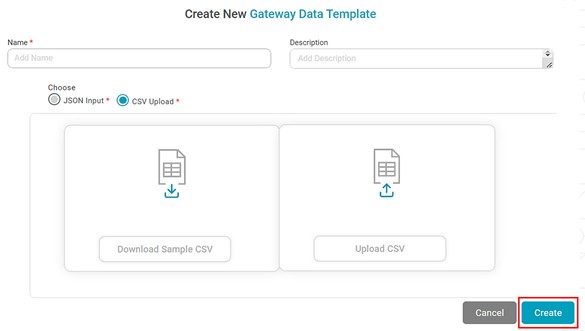
- Select the tile and click on the Create button.
- Enter a suitable Name for the data template. This field is mandatory.
- Add an appropriate Description of the data template.
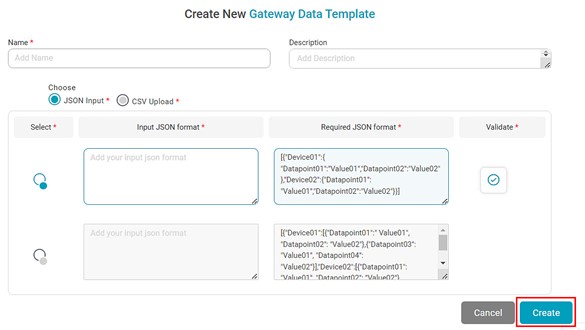
- From the JSON and CSV radio buttons, select the desired one.
- JSON Input
- Add your input JSON format and validate the JSON format. If the pasted JSON format is inappropriate, then a pop-up is shown.
- After validating the JSON, click 'Create' to create the Gateway data template.
CSV Upload

NoteYou can upload CSV files with valid headers only. Click on Download Sample File to download the sample CSV file with the valid headers. Click on the Upload CSV button and select the CSV file.
- Click 'Create' to generate the Gateway data template after uploading the CSV file.
- The Created data template appears in the format GT_Datatemplatename Where GT represents the Gateway Data template. It helps to understand whether the data is coming from a single thing or multiple things.
- Click on the newly created Gateway Data Template to Enter. You can see the columns of the Entity name, Property name, Data type, and Description.
The following table shows the function of each column.
| Column Name | Function |
|---|---|
| Entity Name | It represents the things from which data is coming. |
| Property Name | It represents the properties of the things which are measured. |
| Data type | It represents the type of data received from the thing. |
| Description | It describes the device/ things. |
Related Articles
Deleting a Template
You can delete a data template that is no longer required. To delete a data template, In the Manage dropdown on the home page, click Data Templates. Identify the data template you want to delete. Hover over the data template and click the Delete icon ...Searching a Template
Searching for a template from a long list can be time-consuming. The Search field helps to search your desired template quickly. To search for a data template, In the Manage dropdown, click Data Templates. Type the name of the template you want to ...Editing a Template
To edit a Template, In the Manage dropdown on the home page, click Data Templates. Identify the Data Template you want to edit. To navigate to the Edit Template page, hover over the template and click the Edit icon (). Alternately, you can click on ...Writing to Template File
You can store the result of algorithm flow or the Reader into a Text dataset. You can use the TemplateFile node to create target file datasets within the application. These target files are stored in Text format and can be reused as Text dataset ...Writing into Template Table
You can store the result of algorithm flow or the Reader to a dataset table. Note: You can write to an RDBMS or ODBC (SQL, MySQL, PostgreSQL, or Oracle) datasets only. To write the output data to a template table, follow the steps given below. Build ...


