Copying Node in Same Workbook
Rubiscape provides a facility to copy a single node, multiple nodes, or connected nodes in the same workbook using keyboard events (shortcuts).
Notes: |
|
The table below shows the keyboard commands to perform various actions related to nodes.
Action | Keyboard Command |
|---|---|
Selecting a Node(s) | Click the Node(s) (Alternatively, you can press and drag using the left click on the mousepad or mouse) |
Copying a Node(s) | Control + C |
Pasting a Node(s) | Control + V |
Deleting a Node(s) | Select the Node(s) + Click Delete |
The following sections display some of the scenarios.
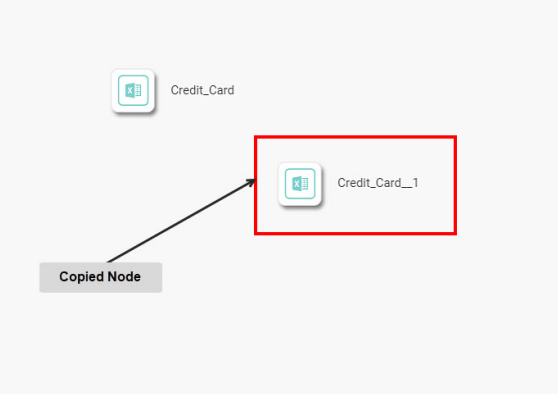
Scenario 1:
- Drag and drop a reader node on the workbook canvas.
- Select the Node.
- On the keyboard, press Control + C.
- Press Control + V.
The Node is copied on the canvas. You can see that the original Node is successfully run while the copied Node is not.
Scenario 2:
- Create a flow using a reader node and some functionality/algorithm nodes. For example, we connect a Reader Node to an Aggregation node connected to the Sorting Node.
- Select the Aggregation and Sorting nodes.
- On the keyboard, press Control + C.
- Press Control + V.
The nodes are copied on the canvas. You can see that they are connected to their predecessor node, the same Reader node. Thus, both the predecessor and successor nodes are updated.

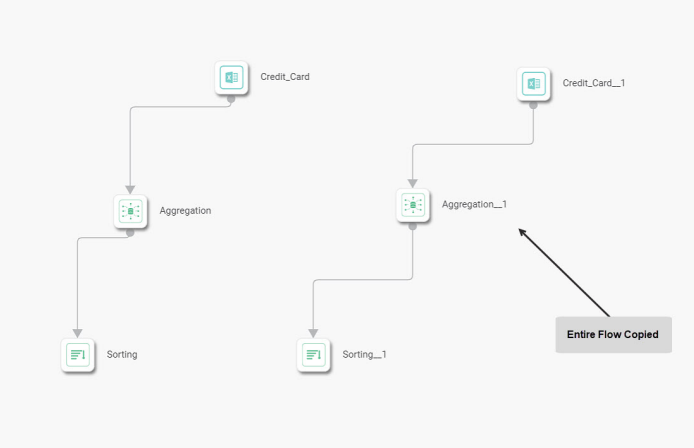
Scenario 3:
- Create a flow using a reader node and some functionality/algorithm nodes. For example, we connect a Reader Node to an Aggregation node connected to the Sorting Node.
- Select the entire flow.
- On the keyboard, press Control + C.
- Press Control + V.
The entire flow is copied on the canvas.
Related Articles
Node Categories
Using Control in Workbook and Workflow Rubiscape provides a combined node hierarchy called Control in Model Studio and Data Integrator. The functionalities present herein are used to perform various tasks on Workbook and Workflow. The sub-categories ...Workbook Validation
In Rubiscape, you can drag-and-drop algorithms and datasets on the workbook or workflow canvas to build a model. When you run the model, Rubiscape validates it before execution. The validation feature is used to notify the validation errors that ...Workbook Validation
In Rubiscape, you can drag-and-drop algorithms and datasets on the workbook or workflow canvas to build a model. When you run the model, Rubiscape validates it before execution. The validation feature is used to notify the validation errors that ...Exploring a Workbook
After successful execution of the workbook or of an individual node in the workbook, you can explore the result of the node. To explore the result of a node, follow the steps given below. Create a workbook or Open an existing workbook. Refer to ...Viewing Log In Workbook
Rubiscape generates a log of the tasks performed in the background when you run an algorithm. The log shows task name, type, duration, and status. The logs and activity trace are particularly helpful for troubleshooting. It also displays the custom ...