File Management
File Management | |||
Description | File management allows you to manage files in different types of storage like GCP, Azure, S3, MinIO and File Server. You are allowed to perform various operations like create, copy & paste, zip, Rename, Delete, cut & paste, wait, and unzip using file management. | ||
Why to use |
| ||
When to use |
| When not to use | When source files are not on a cloud server. |
Prerequisites | You should know the required credentials to connect to the server. | ||
Input | File and File action | Output | Action performed on the file. |
Statistical Methods used | - | Limitations | - |
File Management is located in the left task pane under Model Studio in Data Preparation. Use the drag-and-drop method to use the algorithm in the canvas.

File Management is also located in the left task pane under Data Integration in Data Preparation. Use the drag-and-drop method to use the algorithm in the canvas.

Properties of File Management
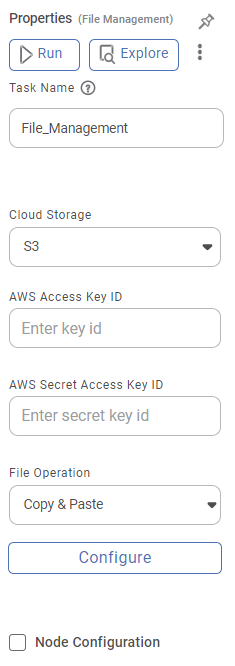
The table below describes different fields present in the properties of File Management.
Field | Description | Remark |
|---|---|---|
Task Name | It is the name of the task selected on the workbook canvas. |
|
Cloud Storage | It allows you to select cloud storage like GCP, Azure, S3, MinIO and File Server. |
|
Cloud connection | It allows you to enter the user credentials. These details are used to connect to the cloud storage. | You can enter the credentials depending on cloud storage. Following are various options depending upon the cloud storage.
|
File Operation | Different file operations are displayed in the list. | You need to select either one of the operations
|
Configure | It allows you to configure the different parameters for the action | Different parameters for the action are explained in detail in Configure section |
Node Configuration | It allows you to select the instance of the AWS server to provide control over the execution of a task in a workbook or workflow. | For more details, refer to Worker Node Configuration. |
Configure the parameters
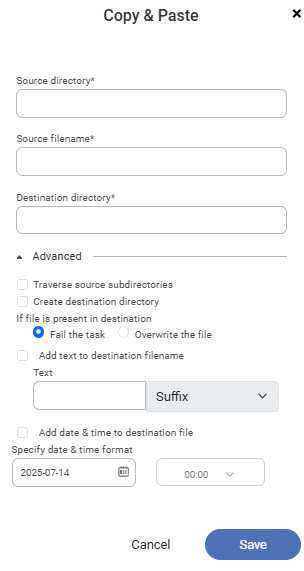
Copy & Paste:
As the name suggests, this action copies a file from one location to another. The following is the list of the configuration parameters for this action. You need to specify the following.
- Source container/bucket – Please specify the container/bucket name. This name should be the same as on the server.
- Source directory – Please specify the source directory. This name should be the same as on the server. For the root directory mention '/'.
- Source filename – You need to specify the filename over here. The file name along with the extension should be the same as on the server.
- Destination container/bucket – Please specify the container/bucket name. This name should be the same as on the server.
- Destination directory – Please specify the source directory. This name should be the same as on the server. For the root directory mention '/'.
- Advanced features – the following options are available
- Traverse source subdirectories – if a user selects this Checkbox then the system travels through the subdirectory to the nth level till it finds the first file occurrence.
- Create a destination directory – If the subdirectory is not available then the subdirectory is created in this case when a user selects this checkbox
- If a file is present in the destination – this is an action item. You need to specify the action to take if the file exists in the desired location. You can choose between the following two options
- Fail the task
- Overwrite the file
- The default section is Fail the task
- Add text to destination filename? This is the next action task. If you check this check box, you have to specify the Text that will be added to the existing file name.
- The Suffix, Prefix dropdown appears next to the Textbox. If you add select Suffix then the text will be added after the existing file name else it will be added before. The default option is Suffix.
- Add date & time to a destination file – if you checked this checkbox then the DateTime is added in a specified format as a suffix to the existing file name. Today's date is displayed as the default date. Similarly, 00:00 is displayed as the default time. You can modify the date and time.
- Add date & time to a destination file – if you checked this checkbox then the DateTime is added in a specified format as a suffix to the existing file name. Today's date is displayed as the default date. Similarly, 00:00 is displayed as the default time. You can modify the date and time.
Cut & Paste:
As the name suggests, this action cuts a file from one location and copies it to another location. The following is the list of the configuration parameters for this action. You need to specify the following.
- Source container/bucket – Please specify the container/bucket name. This name should be the same as on the server.
- Source directory – Please specify the source directory. This name should be the same as on the server. For the root directory mention '/'.
- Source filename – You need to specify the filename over here. The file name along with the extension should be the same as on the server.
- Destination container/bucket – Please specify the container/bucket name. This name should be the same as on the server.
- Destination directory – Please specify the source directory. This name should be the same as on the server. For the root directory mention '/'.
- Advanced features – the following options are available
- Traverse source subdirectories – if a user selects this Checkbox then the system travels through the subdirectory to the nth level till it finds the first file occurrence.
- Create a destination directory – If the subdirectory is not available then the subdirectory is created in this case when a user selects this checkbox
- If a file is present in the destination – this is an action item. You need to specify the action to take if the file exists in the desired location. You can choose between the following two options
- Fail the task
- Overwrite the file
The default section is Fail the task
- Add text to destination filename? This is the next action task. If you check this check box, you have to specify the Text that will be added to the existing file name.
The Suffix, Prefix dropdown appears next to the Textbox. If you add select Suffix then the text will be added after the existing file name else it will be added before. The default option is Suffix.
- Add date & time to a destination file – if you checked this checkbox then the DateTime is added in a specified format as a suffix to the existing file name. Today's date is displayed as the default date. Similarly, 00:00 is displayed as the default time. You can modify the date and time.
The following figure displays the configuration parameters for this action.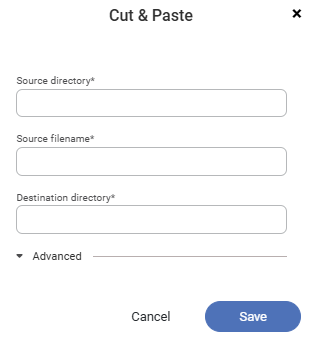
Create
This action creates an empty file in the specified location.
The following is the list of the configuration parameters for this action. You need to specify the following.
- container/bucket – Please specify the container/bucket name. This name should be the same as on the server.
- directory – Please specify the source directory. This name should be the same as on the server. For the root directory mention '/'.
- filename – You need to specify the filename over here. The file name along with the extension should be the same as on the server.
- Advanced features – It contains the Fail if the file exists checkbox. If you check this checkbox, the system fails the task if the file already exists in the specified destination.
The following figure displays the configuration parameters for this action.
Delete
This action deletes the specified file.
The following is the list of the configuration parameters for this action. You need to specify the following.
- container/bucket – Please specify the container/bucket name. This name should be the same as on the server.
- directory – Please specify the source directory. This name should be the same as on the server. For the root directory mention '/'.
- filename – You need to specify the filename over here. The file name along with the extension should be the same as on the server.
- Advanced features – It contains the Traverse subdirectories checkbox. If you check this checkbox then the system traverses through all the subdirectories and deletes all file occurrences. The following figure displays the configuration parameters for this action.

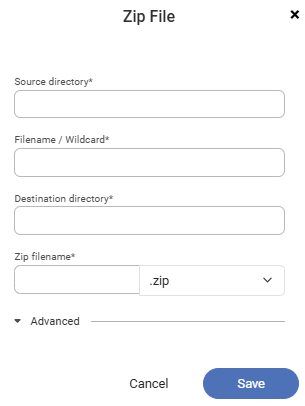
Zip
This action zips a file or folder. The following is the list of the configuration parameters for this action. You need to specify the following.
- Source container/bucket – Please specify the container/bucket name. This name should be the same as on the server.
- Source directory – Please specify the source directory. This name should be the same as on the server. For the root directory mention '/'.
- Filename/Wildcard – You need to specify the filename that needs to be zipped over here. The file name along with the extension should be the same as on the server.
- Destination container/bucket – Please specify the container/bucket name. This name should be the same as on the server.
- Destination directory – Please specify the source directory. This name should be the same as on the server. For the root directory mention '/'.
- Zip Filename – you need to specify the Zip file name in this text box. There is a dropdown with values like .zip and .7z Depending upon your selection file of that type is created. The default option is.zip
- Advanced features – the following options are available
- Traverse source subdirectories – if a user selects this Checkbox then the system travels through the subdirectory to the nth level till it finds the first file occurrence.
- Create a destination directory – If the subdirectory is not available then the subdirectory is created in this case when a user selects this checkbox
- Add text to destination filename? This is the next action task. If you check this check box, you have to specify the Text that will be added to the existing file name.
The Suffix, Prefix dropdown appears next to the Textbox. If you add select Suffix then the text will be added after the existing file name else it will be added before. The default option is Suffix.
- Add date & time to a destination file – if you checked this checkbox then the DateTime is added in a specified format as a suffix to the existing file name. Today's date is displayed as the default date. Similarly, 00:00 is displayed as the default time. You can modify the date and time.
- If a Zip file Exists – this is an action item. You need to specify the action to take if the file exists in the desired location. You can choose between the following two options
- Fail
- Overwrite
The default selection is Fail
- After Zipping – this is an action item. You need to specify what action to be taken. You can choose between the following two options
- Do Nothing
- Delete
The default selection is Do Nothing
The following figure displays the configuration parameters for this action.
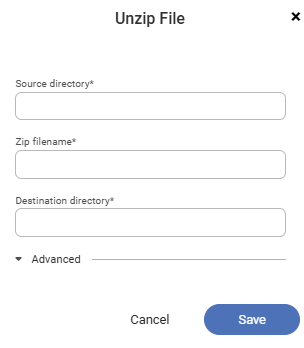
Unzip
This action Unzip the zip file.
The following is the list of the configuration parameters for this action. You need to specify the following.
- Source container/bucket – Please specify the container/bucket name. This name should be the same as on the server.
- Source directory – Please specify the source directory. This name should be the same as on the server. For the root directory mention '/'.
- Zip Filename – You need to specify the zipped filename that needs to be unzipped over here. The file name along with the extension should be the same as on the server.
- Destination container/bucket – Please specify the container/bucket name. This name should be the same as on the server.
- Destination directory – Please specify the source directory. This name should be the same as on the server. For the root directory mention '/'.
- Advanced features – the following options are available
- Traverse source subdirectories – if a user selects this Checkbox then the system travels through the subdirectory to the nth level till it finds the first file occurrence.
- Create a destination directory – If the subdirectory is not available then the subdirectory is created in this case when a user selects this checkbox
- Add text to destination filename? This is the next action task. If you check this check box, you have to specify the Text that will be added to the existing file name.
The Suffix, Prefix dropdown appears next to the Textbox. If you add select Suffix then the text will be added after the existing file name else it will be added before. The default option is Suffix.
- Add date & time to a destination file – if you checked this checkbox then the DateTime is added in a specified format as a suffix to the existing file name. Today's date is displayed as the default date. Similarly, 00:00 is displayed as the default time. You can modify the date and time.
- If a file Exists – this is an action item. You need to specify the action to take if the file exists in the desired location. You can choose between the following three options
- Skip
- Fail
- Overwrite
- The default selection is Skip
- After unzipping – this is an action item. You need to specify what action to be taken. You can choose between the following two options
- Do Nothing
- Delete
The default selection is Do Nothing
The following figure displays the configuration parameters for this action.
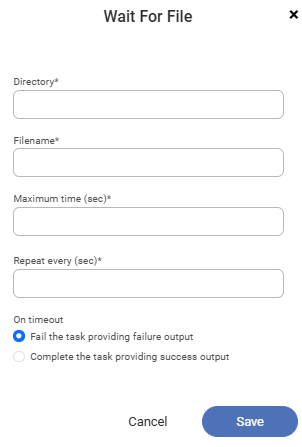
Wait for File
This action waits for a file for a specified time at a specified location. The system sends success once the file is located at the specified location. The following is the list of the configuration parameters for this action. You need to specify the following.
- container/bucket – Please specify the container/bucket name. This name should be the same as on the server.
- directory – Please specify the source directory. This name should be the same as on the server. For the root directory mention '/'.
- Filename – You need to specify the filename that needs to be zipped over here. The file name along with the extension should be the same as on the server.
- Maximum time – You need to provide time in seconds. It will wait for the file for specified seconds to read it.
- Repeat every – if there is no success for reading then the system tries to connect after specified seconds in Repeat every text box. The system repeats this action till the file is located or the maximum waiting time is reached.
- On Timeout – You need to check the radio box in the following options
- Fail the task providing failure output
- Complete the task providing success output
The default option is to Fail the task providing failure output
The following figure displays the configuration parameters for this action.
Rename
This action Renames the file. The following is the list of the configuration parameters for this action. You need to specify the following.
- container/bucket – Please specify the container/bucket name. This name should be the same as on the server.
- directory – Please specify the source directory. This name should be the same as on the server. For the root directory mention '/'.
- Old filename – You need to specify the old filename over here. The file name along with the extension should be the same as on the server.
- New filename – You need to specify the new filename over here. The file name along with the extension should be the same as on the server.
- Advanced features – the following options are available
- Add text to destination filename? This is the next action task. If you check this check box, you have to specify the Text that will be added to the existing file name.
The Suffix, Prefix dropdown appears next to the Textbox. If you add select Suffix then the text will be added after the existing file name else it will be added before. The default option is Suffix.
- Add date & time to a destination file – if you checked this checkbox then the DateTime is added in a specified format as a suffix to the existing file name. Today's date is displayed as the default date. Similarly, 00:00 is displayed as the default time. You can modify the date and time.
The system sends a Success when it is successful to rename the file else it sends a Fail message.
The following figure displays the configuration parameters for this action.
Note: | In the source file name, you can access all the files using '{*}'. For example, using *.xlsx, you can match all the datasets with this extension. Hence, all of these datasets will be verified. |
Related Articles
File Transfer
File Transfer Description The File Transfer node allows seamless file movement across different storage systems including Azure, SFTP, and FTP. It supports both Copy & Paste and Cut & Paste operations. The node supports multi-machine file transfers ...Rubiscape Spring '25
Published On: 09 May 2025 (Release 3.4.2) New Features Rubistudio / Rubiflow Data Compare: The Data Compare task is added to flag differences in the numerical column based on values in the common columns from the predecessor. Profile: The Profile ...Data Preparation
What is Data Preparation Data preparation is the process of cleaning and transforming raw data into organized data so that it can be processed and further analyzed. In data preparation, data is reformatted, corrected, and combined so that it gets ...Rubiscape Autumn '22
New Features Platform & Studio Administrator Module Revamp The release introduces a revamp of the Rubiscape Administrator module from a UI/ UX and functionality perspective. Muti tenancy Ability to create a User under multiple tenants Login A multi ...Rubiscape Autumn (1) '25
Published On: 23 July 2025 (Release 4.0) New Features Rubistudio / Rubiflow GenAI: Prompt Studio task: Added Prompt Studio task under Workflow > Gen AI to generate insights from data using configured models, with support for column-level input, ...