File Transfer
Field
Description
Remark
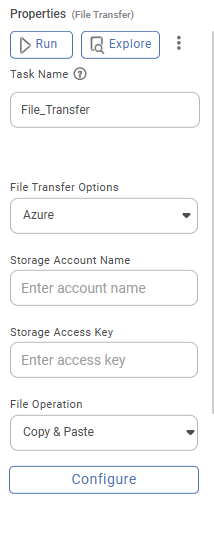
Task Name
It is the name of the task selected on the workbook canvas.
- You can click the text field to edit or modify the task's name.
- Space between words is not allowed in the Task Name.
File Transfer Options
It allows you to select the file transfer options like Azure, SFTP, FTP.
- You can select only one option.
Server connection
It allows you to enter the user credentials. These details are used to connect to the server.
You can enter the credentials depending on the server you want to connect. Following are various options:..
- Azure: Enter the following to connect Azure server
- Storage Account Name in string format
- Storage Access Keys to access the server
- Azure provides these two values when you create the account.
- FTP: Enter the following to connect FTP server
- Click on configure.
- Select authentication type as either password or SSH key. If SSH key is selected, upload the SSH key file.
- If the selected worker is source, FTP will act as the destination. Enter the destination host, port, and directory, and vice versa.
- SFTP: Enter the following to connect SFTP server
- Click on configure.
- Select authentication type as either password or SSH key. If SSH key is selected, upload the SSH key file.
- If the selected worker is source, SFTP will act as the destination. Enter the destination host, port, and directory, and vice versa.
Worker As
This option is only available for SFTP & FTP. You can select worker as source or destination.
If you select the worker as source, the server where our application is hosted will be considered the source, and vice versa.
File Operation
There are two file operations available.
You need to select either one of the operations
· Copy & Paste
· Cut & Paste
Configuration
It allows you to configure the different parameters for the action.
Different parameters for the action are explained in detail in configure section.
Field | Description | Remark |
|---|---|---|
Task Name | It is the name of the task selected on the workbook canvas. |
|
File Transfer Options | It allows you to select the file transfer options like Azure, SFTP, FTP. |
|
Server connection | It allows you to enter the user credentials. These details are used to connect to the server. | You can enter the credentials depending on the server you want to connect. Following are various options:..
|
Worker As | This option is only available for SFTP & FTP. You can select worker as source or destination. | If you select the worker as source, the server where our application is hosted will be considered the source, and vice versa. |
File Operation | There are two file operations available. | You need to select either one of the operations · Copy & Paste · Cut & Paste |
Configuration | It allows you to configure the different parameters for the action. | Different parameters for the action are explained in detail in configure section. |
| Node Configuration | It allows you to enter the queue name. | Execution will take place in celery using the specified queue name. If no queue name is provided, it will run on the default celery queue. For more details, refer to Worker Node Configuration. |
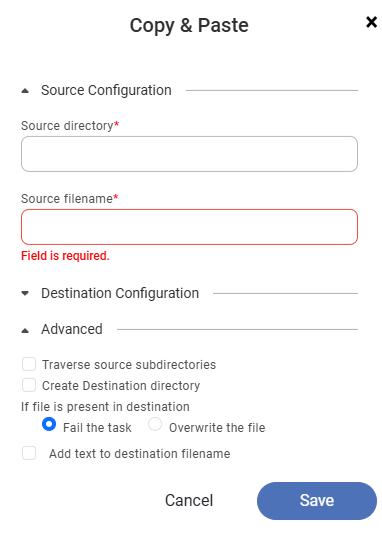
As the name suggests, this action copies a file from one location and paste it to another location. The following is the list of the configuration parameters for this action. You need to specify the following.
- Source directory – Please specify the source directory. This name should be the same as on the server. For the root directory mention '/'.
- Source filename – You need to specify the filename over here. The file name along with the extension should be the same as on the server.
- Destination container/bucket – Please specify the container/bucket name. This name should be the same as on the server.
- Destination directory – Please specify the source directory. This name should be the same as on the server. For the root directory mention '/'.
- Advanced features – the following options are available
- Traverse source subdirectories – if a user selects this Checkbox then the system travels through the subdirectory to the nth level till it finds the first file occurrence.
- Create a destination directory – If the subdirectory is not available then the subdirectory is created in this case when a user selects this checkbox
- If a file is present in the destination – this is an action item. You need to specify the action to take if the file exists in the desired location. You can choose between the following two options
- Fail the task
- Overwrite the file
The default section is Fail the task
- Add text to destination filename? This is the next action task. If you check this check box, you have to specify the Text that will be added to the existing file name.
- The Suffix, Prefix dropdown appears next to the Textbox. If you add select Suffix then the text will be added after the existing file name else it will be added before. The default option is Suffix.
- Add date & time to a destination file – if you checked this checkbox then the datetime is added in a specified format as a suffix to the existing file name. Today's date is displayed as the default date. Similarly, 00:00 is displayed as the default time. You can modify the date and time.
The following figure displays the configuration parameters for this action.
- Traverse source subdirectories – if a user selects this Checkbox then the system travels through the subdirectory to the nth level till it finds the first file occurrence.
- Create a destination directory – If the subdirectory is not available then the subdirectory is created in this case when a user selects this checkbox
- If a file is present in the destination – this is an action item. You need to specify the action to take if the file exists in the desired location. You can choose between the following two options
- Fail the task
- Overwrite the file
The following figure displays the configuration parameters for this action.
Cut & Paste:
As the name suggests, this action cuts a file from one location and copies it to another location. The following is the list of the configuration parameters for this action. You need to specify the following.
- Source directory – Please specify the source directory. This name should be the same as on the server. For the root directory mention '/'.
- Source filename – You need to specify the filename over here. The file name along with the extension should be the same as on the server.
- Destination container/bucket – Please specify the container/bucket name. This name should be the same as on the server.
- Destination directory – Please specify the source directory. This name should be the same as on the server. For the root directory mention '/'.
- Advanced features – the following options are available
- Traverse source subdirectories – if a user selects this Checkbox then the system travels through the subdirectory to the nth level till it finds the first file occurrence.
- Create a destination directory – If the subdirectory is not available then the subdirectory is created in this case when a user selects this checkbox
- If a file is present in the destination – this is an action item. You need to specify the action to take if the file exists in the desired location. You can choose between the following two options
- Fail the task
- Overwrite the file
The default section is Fail the task
- Add text to destination filename? This is the next action task. If you check this check box, you have to specify the Text that will be added to the existing file name.
- The Suffix, Prefix dropdown appears next to the Textbox. If you add select Suffix then the text will be added after the existing file name else it will be added before. The default option is Suffix.
- Add date & time to a destination file – if you checked this checkbox then the datetime is added in a specified format as a suffix to the existing file name. Today's date is displayed as the default date. Similarly, 00:00 is displayed as the default time. You can modify the date and time.
The following figure displays the configuration parameters for this action.

- File transfer task–specific logs are available via the View Logs button in the properties pane, showing details like source/destination file names, directories, status, hosts, storage info, timestamps, and log messages.
- Traverse source subdirectories – if a user selects this Checkbox then the system travels through the subdirectory to the nth level till it finds the first file occurrence.
- Create a destination directory – If the subdirectory is not available then the subdirectory is created in this case when a user selects this checkbox
- If a file is present in the destination – this is an action item. You need to specify the action to take if the file exists in the desired location. You can choose between the following two options
- Fail the task
- Overwrite the file
The following figure displays the configuration parameters for this action.
Related Articles
File Path
Note The File Path option is disabled for use in SAAS. It will work in Desktop application only. Rubiscape provides you six options to select the source to create a dataset. The available options are: Upload File S3 FTP Azure Blob Storage File Path ...Working with File Server
Understanding File Server Pane The File Server allows you upload files/ and folders on Rubiscape cloud storage for the current workspace. You can upload files of all formats and use them while creating a dataset or working with RubiNotebook or ...Rubiscape File Server
The Rubiscape File Server lets you upload files/folders on cloud storage for the current workspace. You can use these files while creating a dataset or working with RubiNotebook or RubiPython. Rubiscape provides you six options to select the source ...Writing to Template File
You can store the result of algorithm flow or the Reader into a Text dataset. You can use the TemplateFile node to create target file datasets within the application. These target files are stored in Text format and can be reused as Text dataset ...Writing Data to the Template File
You can store the result of algorithm flow or the Reader into a CSV dataset. You can use the TemplateFile node to create target file datasets within the application. These target files are stored in CSV format and can be reused as CSV dataset within ...