Managing Licensing
Rubiscape offers its data science platform as a service to its clients. When you purchase a Rubiscape license, Rubiscape assigns a unique license key to you.
Following is the exhaustive list of Module Access privileges that the client may receive with the license key. You can purchase the license for any combination of these applications.
- Administrator
- RubiFlow
- RubiSight – Designer
- RubiSight – Viewer
- RubiStudio
- RubiThings
Uploading License Key
For a newly added tenant, an Admin user is also created during tenant creation. The Admin can log in to the Admin Module, but no license is granted. You need to activate the license by uploading the license key when you log in credentials. Refer to Adding a Tenant.
To upload the license key,
- On the Rubiscape login page, enter the Username and Password.
- Select the Tenant from the drop-down.
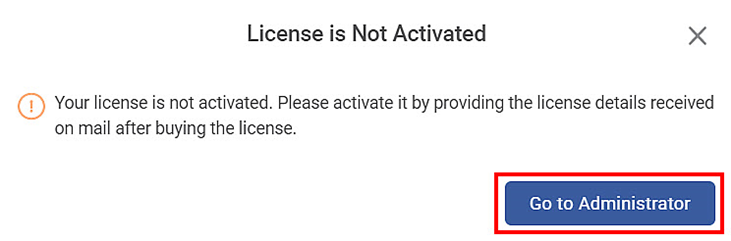
- Click Get Started. You see the message displayed in the figure below.
- Click Go to Administrator on the message. You are navigated to the Licensing page.
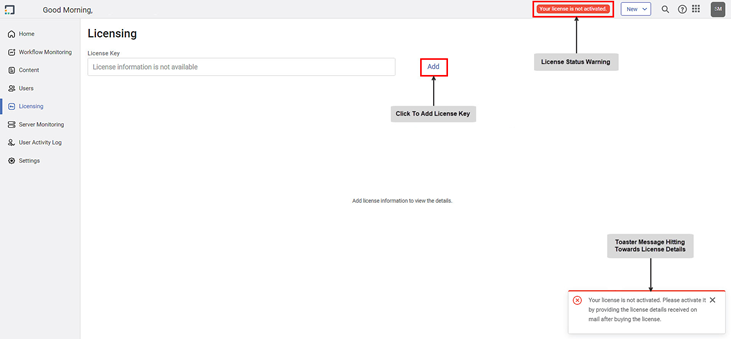
On the Licensing page, you see
- A toaster message advising you to visit the email account where the licensing key is dispatched.
- A License Status warning message saying, "Your License is not activated."
- A clickable Add button to add the license key file.
To continue uploading the license key,
- Click Add.
- On the next page, click Upload File. You are prompted to your system/machine.
- Navigate to the folder where you have stored the license file, select, and double-click the file. The file is uploaded to the License Key field.
- Click Save. Your license is activated, and you are directed to the Licensing page that displays all the license details.

|
|

License Details
After the license is activated/updated, users can consume the modules according to the specified limit in the license.
The license holds the following information:
- License Key
- License Details:
- Start Date
- End Date
- Days Remaining
- Module-wise allowed users (maximum)
- User License Usage:
- Used Licenses in each Module (actual consumption)
- Available Licenses in each Module (unused)
- Total Licenses in each Module
For example, in the image below, out of 999 Administrator Module licenses, 103 licenses are used (consumed), and 896 are available (unused).
The module usage is represented using a stacked bar chart as shown below.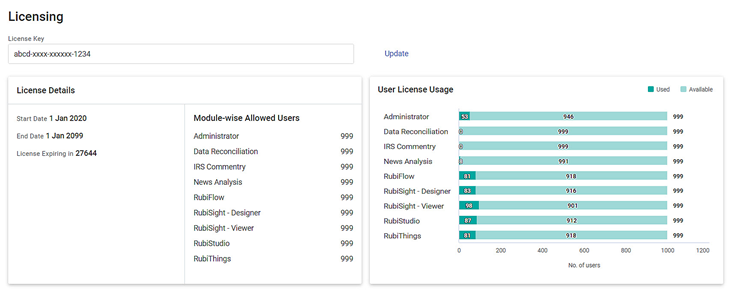
The Administrator adds roles with access to different modules as required and assigns those roles to various users. Once these roles are assigned to active users, the module licenses start consuming. After the maximum possible licenses for a module are consumed, the count of available licenses for that module becomes zero. Beyond this, any user cannot be assigned a role that contains this module. If you try to assign the role, you get an error message. For details, read the Note below.
|
|
Below are some scenarios to understand restrictions and permissions after the license key expires.
Scenario 1:
You are performing one of the following actions that influence assigning roles to a user.
- Adding a user
- Editing a user
- Changing the status of a user (inactive to active)
Further, consider a situation where the maximum limit for any one or multiple modules in that role is reached.
If you try to assign that role to a user by performing any of the above actions, you get a toaster message saying, "License consumption maximum limit reached for Module_Name(s) module/s."
For example, "License consumption maximum limit reached for RubiStudio, Rubiflow modules."
Scenario 2:
Suppose, the maximum license limit for a given Module A is reached. This Module A is present in Role 1 (this can be a new or existing one).
Now, if you add Active Users to this role, and click Add Role/Save Role, a toaster error message "License consumption maximum limit reached for A module/s" is displayed.
However, you can Add or Save Roles with as many Inactive Users as you wish.
Scenario 3:
A license key is upgraded.
The module-wise allowed user count for some of the modules is changed, while some of the modules are not subscribed anymore, as per the license upgrade.
The usage and the available count will always be zero for the unsubscribed modules. However, if any user is assigned a role that contains this module (now unsubscribed), the user will become inactive.
The above scenario displays a possibility as per the license update/upgrade. If there are no changes made in the previous licenses, then the same active users/modules on the role page are retained.
Scenario 4:
A license key is upgraded in which the number of licenses for a particular module is decreased.
In this case, the status of the existing number of users changes according to the date and time on which they were added.
For example, while upgrading a license key, the number of RubiFlow module users is reduced from ten (10) to five (5). Then, the first five chronologically created users remain active, and the remaining five become inactive.
| If a user has not purchased the license for some of the modules, they appear in the Role but are disabled for selection. |
Understanding License Restrictions
You can log into the Rubiscape platform or the Admin module when the license expires. However, you have only restricted/limited access. When you log in to the Rubiscape platform, a License Expired message is displayed, and you get an option to go to the Administrator page.
You can log in to the Admin Module to update the licensing key. This is allowed only for the users with Admin access.
|
|

The table below summarizes what's allowed and not when the Rubiscape license expires.
Role | Allowed | Not allowed |
|---|---|---|
Super Admin / Root Admin / Admin |
|
|
Super User |
|
|
Non-admin User | NA |
|
Updating License Key
It is advisable to renew the license key before the subscription key expires. For this, you need to renew your license.
To renew the license,
- On the Licensing page, click Update.
- On the next page, click Upload File. You are prompted to your system/machine.
- Navigate to the folder where you have stored the license file, select, and double-click the file. The file is uploaded to the License Key field.
- Click Save. You are directed to the Licensing page.

The licensing page now displays the revised details of the license.
Related Articles
Managing Datasets
What is Reader In rubiscape, a reader is referred to as a dataset. Dataset is a collection of elements extracted from different sources that can be integrated into one. The datasets added can be shared across different Projects. They are used to ...Managing Things
Understanding Things A thing in RubiThings is any physical object, such as an intelligent sensor or edge device that can transfer data over a network, any of the IoT-enabled devices Adding a New thing You can add a thing by Clicking Things in the ...Managing Rules
Understanding Rules A rule in RubiThings is a set of instructions defined to trigger and generate an alert based on the specified condition. These rules get applied to any data packet in near real-time. Adding a Rule You can add a rule by Clicking ...Managing Groups
Understanding Groups A group in RubiThings is to organize your things dynamically into logical groups by tagging them. Adding a Group You can add a group by Clicking Groups in the Manage dropdown (for the first time) Clicking Create Group on the ...Managing Workflows
You can schedule workflows to run at pre-decided time intervals as an administrator. The scheduled workflows execute at the set time without any user intervention. It makes the automation of certain processes easier. You can Create new schedules Run ...