Managing Rules
Understanding Rules
A rule in RubiThings is a set of instructions defined to trigger and generate an alert based on the specified condition. These rules get applied to any data packet in near real-time.
Adding a Rule
You can add a rule by
- Clicking Rules in the Manage dropdown (for the first time)
- Clicking Create Rule on the top-right corner of the Rules page (after you have added a rule)
- Clicking Create Rule from the Create (
 ) menu present on the title pane.
To add a rule,
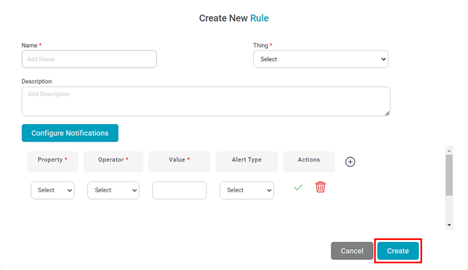
- In the Manage dropdown, click Rule. A Create New Rule page is displayed.
- Enter a suitable Name for the Rule. This field is mandatory.
- From the Thing dropdown, select the Thing for which you want to set the Rule. This field is mandatory.
- Add a suitable Description of the Rule.
- Click on Configure Notification to get the alert notifications on Email or WhatsApp.
- From the Property dropdown, select the Property using which you want to set the Rule. The list in the Property dropdown gets auto-populated according to the Thing selected above.
- From the Operator dropdown, select the mathematical expression for the Rule. The available operators are
- Equal to (==)
- Not equal to (! =)
- Less than (<)
- Greater than (>)
- Greater than or equal to (>=)
- Less than or equal to (<=)
- Corresponding the Property selected, enter a suitable Value. For example, you can create a rule for the property "Temperature" as "Temperature >= 24".
- From the Alert Type dropdown, select the alert type. The available alert type is Warning, Critical, None.
- Click the Save icon (
 ) to save the Property.
 - Click Add Row button to add the next Property. You can add as many properties as you want.
- After you have added the required properties, click Create. The Rule is created and added to the list on the Rules page.
|
|

The table below describes the various icons on the Create New Rule Template page for performing various operations on the added properties.
Icon | Name | Click to |
| Edit Icon | Edit a property |
| Delete Icon | Delete a property |
| Add Icon | Add a New Row |
| Delete Row | Clear the Row |


Searching Rule
Searching for a rule from a long list can be time-consuming. The Search field helps to search your desired Rule quickly.To search for a rule,
- In the Manage dropdown, click Rules.
- Type the name of the Rule you want to search.
Partial names are allowed for searching. A list of rule names matching the search string is populated as you start typing. For example, in the image below, as we type the string "Demo," the template results with the same string are populated on the dashboard.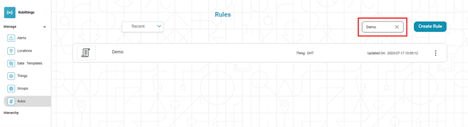
Sorting Rule
The Rules are sorted by the date and time they were created, with the most recent Rule appearing first. You can also sort rules according to alphabetical order.To sort rules,
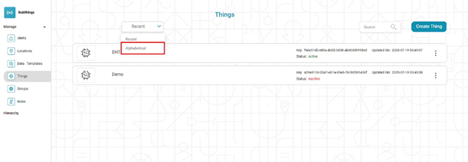
- In the Manage dropdown, click Rules.
- Click Recent near the top-right corner.
- Select Alphabetical. The list is sorted in alphabetical order.
Editing Rule
To edit a rule,
- In the Manage dropdown on the home page, click Rules.
- Identify the Rule you want to edit.
- To navigate to the Edit Rule page, hover over the Rule and click the Edit icon (
 ). Alternately, you can click on the Rule and then click the Edit icon ( ) on the next page.
 - On the Edit Rule page, make the necessary changes to the various fields.
- Click Update. Your Rule is saved with the updated information.
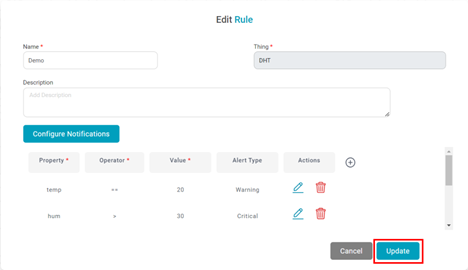
| Out of the various fields, the Thing field is not available for editing because we define a rule or a set of rules for the Thing. |
Deleting Rule
You can delete a rule that is no longer required. To delete a rule,
- In the Manage dropdown on the home page, click Rules.
- Identify the Rule you want to delete.
- Hover over the group and click the Delete icon (
 ). A confirmation message to delete the Thing pops up.
 - Click Delete on the message. The Rule is deleted, and a confirmation message is displayed.
Related Articles
Managing Datasets
What is Reader In rubiscape, a reader is referred to as a dataset. Dataset is a collection of elements extracted from different sources that can be integrated into one. The datasets added can be shared across different Projects. They are used to ...Managing Things
Understanding Things A thing in RubiThings is any physical object, such as an intelligent sensor or edge device that can transfer data over a network, any of the IoT-enabled devices Adding a New thing You can add a thing by Clicking Things in the ...Managing Groups
Understanding Groups A group in RubiThings is to organize your things dynamically into logical groups by tagging them. Adding a Group You can add a group by Clicking Groups in the Manage dropdown (for the first time) Clicking Create Group on the ...Managing Workflows
You can schedule workflows to run at pre-decided time intervals as an administrator. The scheduled workflows execute at the set time without any user intervention. It makes the automation of certain processes easier. You can Create new schedules Run ...Managing Users
You can view your Tenant's users, groups, and roles in the User space. The four clickable KPI Cards for Live User Sessions, Users, Groups, and Roles take you to the respective tabs on the User Page. You can see a User Sessions chart on each of the ...