Managing Users
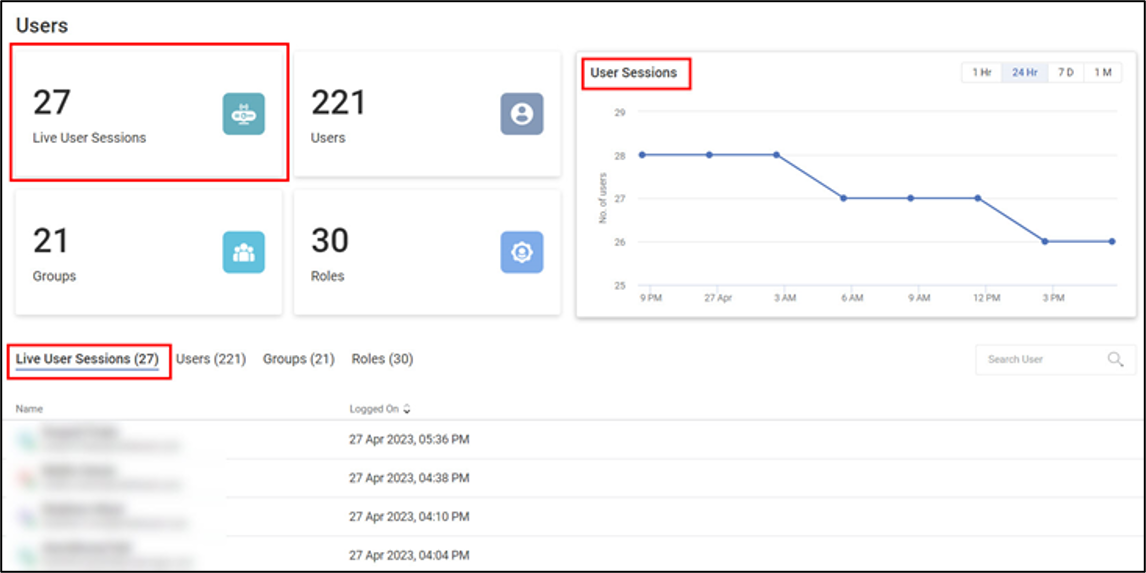
You can view your Tenant's users, groups, and roles in the User space. The four clickable KPI Cards for Live User Sessions, Users, Groups, and Roles take you to the respective tabs on the User Page.
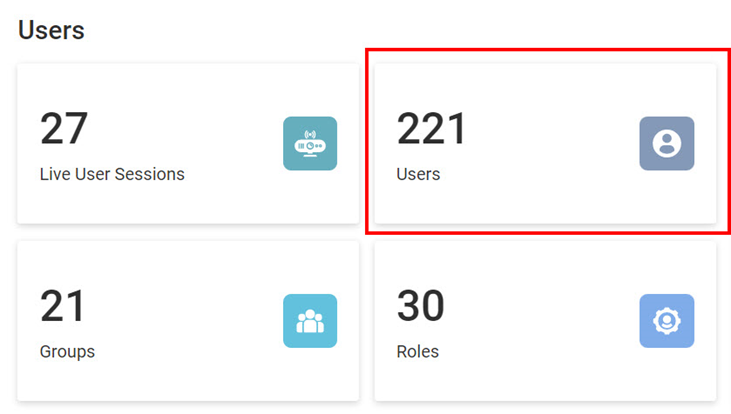
You can see a User Sessions chart on each of the above tabs, as shown below.
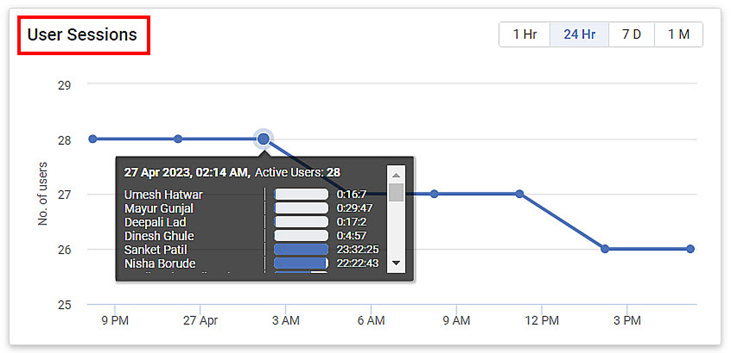
Indicators:
- Line graph for the number of users active or live at any time.
- The frequency is set to 24Hr by default. You can change the frequency to 1Hr, 7 days, and 1 month as required.
- Hover over any time spot to view a tooltip that displays the live user details.
The image below shows the contents below the Users tab.

The following table explains various fields on the Users tab.
Field/Icon | Description |
|---|---|
| User KPI Card
|
User Sessions | User Session Chart
|
Users (Number) | Users List Tab
|
Search User |
|
Add New User |
|
| Menu Icon
|


Adding a User
To add a user, you need to fill in the details in the
- User Details Section
- Access Control Section
|
|
To add a user,
- In the Users tab, click Add New User on the extreme right. The Add User page is displayed.It contains two sections, viz: User Details and Access Control.
- In the User Details section, add the required details. Refer to the table below.
- Click Add in the top-right corner. The newly added user appears in the Users list on the Users page.
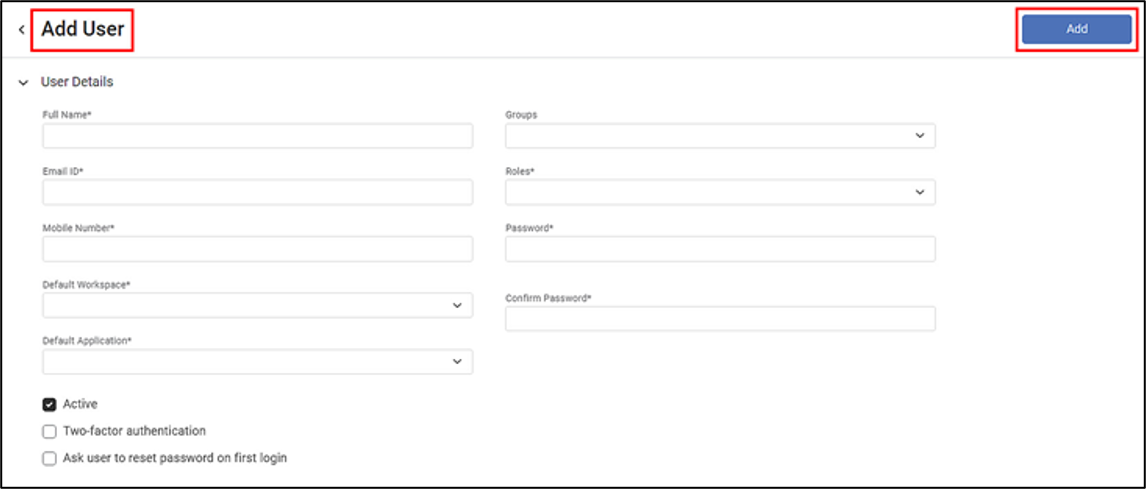
The following table explains various fields under User Details.
(Field* – Mandatory)
Field/Icon | Description |
|---|---|
Full Name* |
|
Email ID* |
|
Mobile Number* |
|
Default Workspace* |
|
Default Application* |
|
Groups |
|
Roles* |
|
Password* |
|
Confirm password* |
|
Active |
|
Two-factor authentication |
|
Ask user to reset password on first login |
|
| Send Email Notification |
|
| After creating a user, hover over the user and click anywhere on the highlighted row. You can see the user's detailed summary. This includes,
|
Importing a User
Importing users helps maintain user-related basic information and ensures user consistency across all tenants. Importing a user to a tenant is very similar to Adding a User. With this functionality you can import the existing user from another tenant with its basic details. There will be no need to create same user again.
To Import a User, follow the steps below:
- Sign in to the Rubiscape application as at least a User Administrator.
For more info, refer to Signing into the Application - Browse to Users > Add New User.
- Select the Import User radio button.
- On the import user page, search or select the active users you want to import into the tenant. Then click Add.
In the User Details Section on the Add Use Page, provide the user’s information.
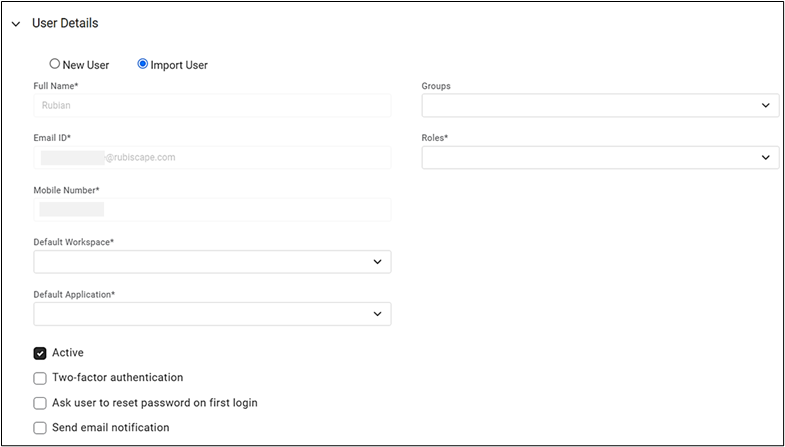
Note
- The user's full name, email ID, and mobile number fields are inactive because the system automatically imports these details at the user level.
- To edit the details, navigate to the Users section. For more info, refer to Editing a User.
Default Workspace: Select a default workspace for a user to manage multiple datasets and projects. It is a mandatory field.
- Default Application: From the available list, select the single application. When a user logs in to Rubiscape, this application opens by default.
- Groups: A user is assigned to the group "Everyone" by default, even if no group is selected. Select the Group(s) to which you want to add the user.
- Roles: Roles are the titles/responsibilities to be assigned to a user. From the available list, select the role(s).
- Active: Indicates that the user is active. The checkbox is selected by default.
- Two-factor authentication: It provides extra authentication in the form of an OTP (One-Time Password) for the user. By default, the checkbox is cleared.
- Ask the user to reset the password on the first login: If selected, it directs the user to create a new password on the first login only.
- Send email notification: Select the checkbox to send the welcome message and rubiscape account details to the user over the registered email address.
- Select Add.
The user is added and appears on the Users
Searching a User
Searching a user from a long list can be time-consuming. The Search User field helps to search for your desired user quickly.
To search for a user,
- In the Users tab, click inside the Search Users field.
- Type the name of the user you want to search. Partial names are allowed for searching. A list of usernames matching the search string is populated as you start typing.
Editing a User
As an administrator, you can edit the user profile when required. This includes editing/changing the username, updating the mobile number, changing/adding/removing the groups and roles assigned to the user, and changing the default workspace and the default application for the user. You can also activate or deactivate the user.
To edit a user,
- Hover over the user you want to edit,
- Click anywhere on the highlighted row and click Edit User on the next page.
- Click on the menu icon (

You are navigated to the Edit User page.
- Make changes to the user details as required.
- Click Save on the top-right corner. The updated user appears in the Users list on the Users page.
Activating a User
To activate an inactive user,
- Hover over the inactive user you want to activate,
- Click anywhere on the highlighted row and click Edit User on the next page.
- Click on the menu icon (
 ) and click Activate.
- Select the ACTIVE check box.
- Click Save on the top-right corner. The user's status appears as Active on the Users page.
Deactivating a User
As an administrator, you cannot delete users. However, you can deactivate them so that they cannot access any entities within a workspace.
To deactivate an active user,
- Hover over the active user you want to deactivate,
- Click anywhere on the highlighted row and click Edit User on the next page.
- Click on the menu icon ( ) and click Deactivate.
- Clear the ACTIVE check box.
- Click Save on the top-right corner. The user's status appears as Inactive on the Users page.
|
|
Resetting User Password
As an administrator, you can reset a user's password.
To reset the user's password,
- Log in to the Rubiscape application.
- On
the Home screen select Applications (
 ) > Administrator (
 ).
).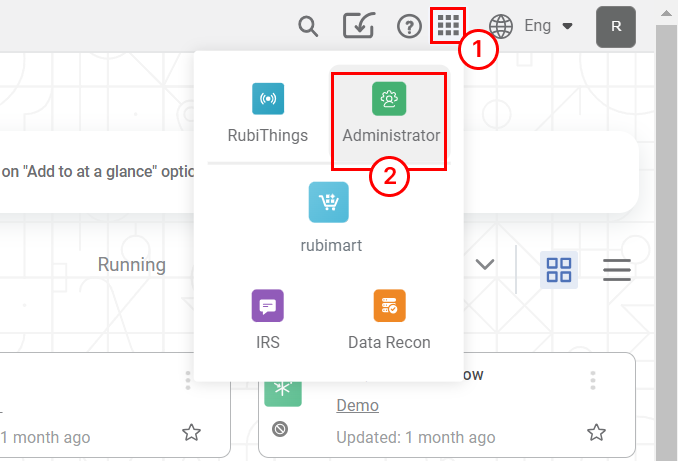
- On the Administrator Home Page, In the left-hand sidebar, click on the Users tab to view the user management section.
- On the user list page, locate the
user for whom you want to reset the password.
- Click the vertical ellipse (
) on the right-hand side of the user row.
- Select Reset Password.

- In the Reset Password window that appears, enter the desired new password for the user.
 NoteEnsure that none of the checkboxes below the password field are selected.
If any are checked, please uncheck them. - Click the Reset.
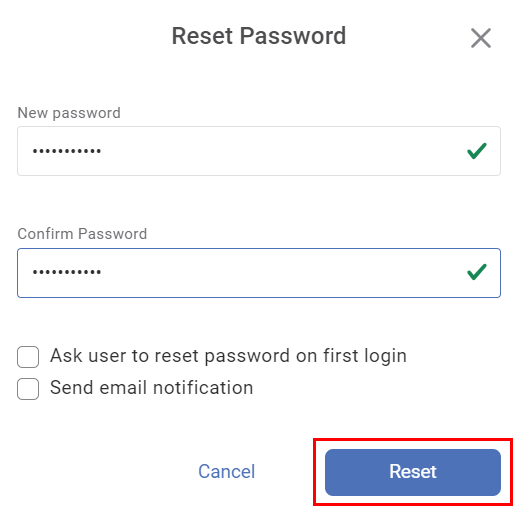
The user will now be able to log in using the new password.
|
|
User Access Control
In the Access Control section, under separate tabs, you can see the
- User's Default Workspace
- Projects and Datasets under it
You can control a user's access to workspaces, projects, and datasets as an administrator.
To change the access controls to Projects and Datasets,
- Navigate individually to a project or dataset.
- Select or clear the checkboxes corresponding to View, Modify, Delete, or Deny.
- Click Save. The changes to access controls are modified.
The following table helps us understand the hierarchy of the four access controls.
Access | Users can | Additionally, Users can |
|---|---|---|
View | Only view a Workspace, project, and Dataset | – |
Modify | Modify a Workspace, Project, and Dataset | View a Workspace, Project, and Dataset |
Delete | Delete a Workspace, Project, and Dataset | View and Modify a Workspace, Project, and Dataset |
Deny | NOT modify, view, or delete a Workspace, Project, and Dataset | – |
|
|
Live User Sessions
The Live User Sessions summarize the users who are currently active and live.
The image below shows the contents below the Live User Session tab.
The following table explains various fields on the Live Users Sessions tab.
Field/Icon | Description |
|---|---|
| Live Users Session KPI Card
|
User Sessions | User Session Chart
|
Live User Session (Number) | Live Users List Tab
|
Search User |
|
Viewing User Sessions
As an administrator, you can keep track of the user's activity. User activity is Tenant specific. The User activity log summarizes all the user's activity for one day at a given time.
You can view the user activity of
- All users under a tenant
- An individual user
To view all users' activity under a tenant, in the Functions pane, click User Activity Log.
By default, the User Activity Log page displays All users' activity under the Tenant for the current date.
The page displays,
- User (All by default)
- Date of the log
- Time of the activity
- Username
- Activity Type (logged in, logged out, created new, logged existing, ran, read, updated, edited, refreshed, aborted, exported, deleted)
- Entity (Application, Dataset, Dashboard, Workflow, Workbook, Project)
- Entity Name
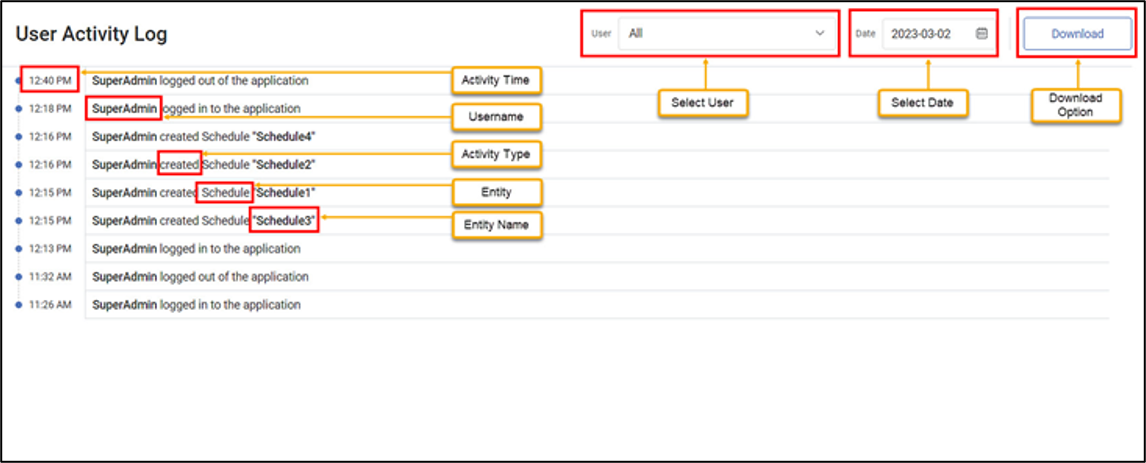
Using the User Activity Log, you can
- Select different users from the User drop-down to see user-specific activity
- Select any date by clicking the calendar icon (
 ) to view the user activity for that date
 - Download the user activity log to your system as a CSV file
Tip |
|
Related Articles
Managing Licensing
Rubiscape offers its data science platform as a service to its clients. When you purchase a Rubiscape license, Rubiscape assigns a unique license key to you. Following is the exhaustive list of Module Access privileges that the client may receive ...Managing Tenants
Tenant is a non-human entity that governs users, groups, roles, workspaces, projects, and datasets. Tenant is created and governed by a Super Admin. Each tenant has at least one admin who governs its entities. You can view all, active and inactive, ...Users
You can view your Tenant's users, groups, and roles in the User space. The four clickable KPI Cards for Live User Sessions, Users, Groups, and Roles take you to the respective tabs on the User Page. You can see a User Sessions chart on each of the ...Managing Datasets
What is Reader In rubiscape, a reader is referred to as a dataset. Dataset is a collection of elements extracted from different sources that can be integrated into one. The datasets added can be shared across different Projects. They are used to ...Managing Things
Understanding Things A thing in RubiThings is any physical object, such as an intelligent sensor or edge device that can transfer data over a network, any of the IoT-enabled devices Adding a New thing You can add a thing by Clicking Things in the ...