Using Rubiflow Scheduler
The Rubiflow Scheduler helps you to schedule workflows to run at pre-decided time intervals. The scheduled workflows execute at the set time without any user intervention. This makes it easy to automate certain processes.
To schedule your workflow, follow the steps given below.
- Open the workflow that you want to schedule. Refer to Opening a Workflow.
- Click the ellipsis (
 ) located on the function pane.
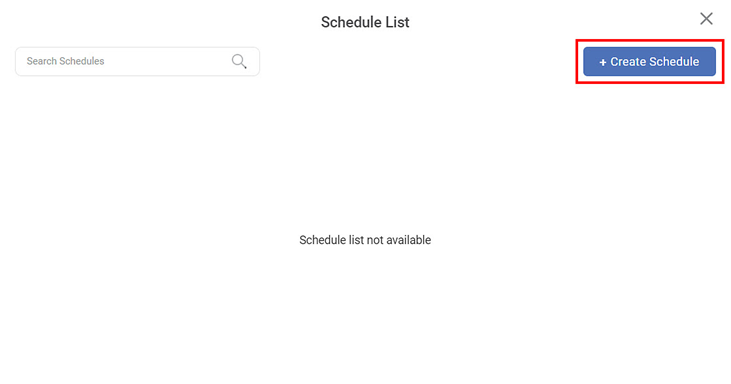
 - From the options displayed, click the Schedule (
 ) icon.Schedule List is displayed.
 Click Create Schedule.
 Note:
Note:To Edit or Delete the scheduled run, Click the ellipsis (
) corresponding to it.Create Schedule page is displayed.
Enter/select the required fields.
The table given below describes the fields and buttons present on the create schedule screen.Field
Description
Name
Enter the title for the scheduled run
Description
Enter a short description for the scheduled run.
Schedule
Schedule on run data
Select the time period on which it should be run - monthly, weekly, or daily.
Active
Select active check box to keep your schedule active.
Start date/ End date
Select the date from when you want to schedule the run till the date where you want to end it.
Select day
In case of weekly schedule , select the day of the week for the run.
Run time
Enter the time that you want to set for scheduled run. Please note, this time is in UTC.
Notify Run status
Email notification
Select EMAIL NOTIFICATION check box to enable the notifications via email; clear it otherwise.
Email address
Enter the email address where you want the notification to be sent.
Message
Enter the message to be used in the notification email.
Click Create.
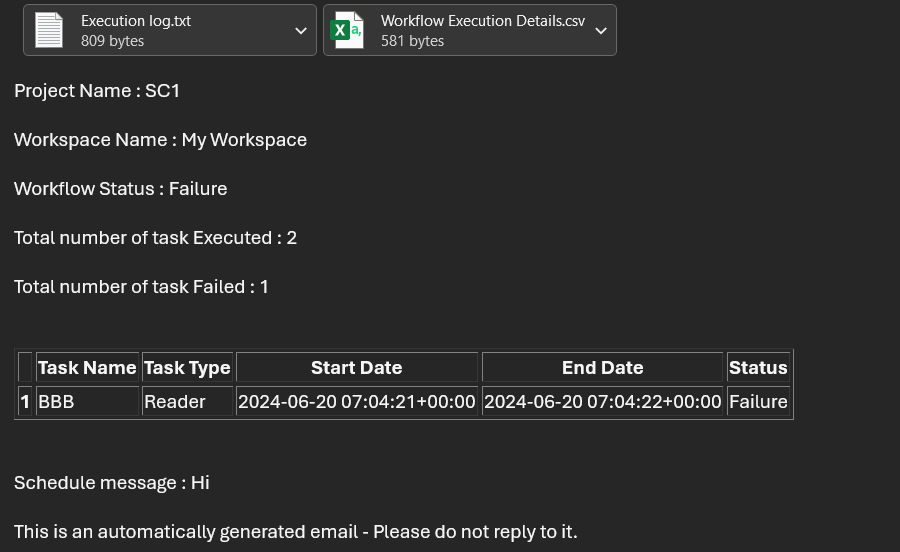
Upon successful creation, your schedule is displayed in the schedule list and the workflow runs at the scheduled time.After execution you receive a mail with detailed description about Execution Logs, Workflow status, total number of tasks executed, and total number of task failed and its description.
| Schedule Type | Description | Related Fields |
| Daily | For daily export of the dashboard. |
|
| Weekly | For weekly export of the dashboard. |
|
| Monthly | For monthly export of the dashboard. |
|
| Send Now | For immediate export of the dashboard (after creating the schedule). |
|
| Fortnightly | For export after 15 days from the start date |
|
| Half-Monthly | For export on 1st and 16th and so on |
|
| Last Friday of the Month | For export on last friday of the month |
|
| Quarterly | For export on each quarter change |
|
| Half-Yearly | For export in the interval of 6 months in the defined duration |
|
| Yearly | For export in the interval of 1 year (12 months) in the defined duration |
|
Note: | Make sure that all schedule Time is created as per the Coordinated Universal Time (UTC) format. |
Related Articles
Building Algorithm Flow in a Workflow Canvas
Building algorithm flow in a Workflow Canvas is similar to building algorithm flow in a Workbook Canvas. You can use your trained algorithms here. To build algorithm flow in a Workflow Canvas, refer to Building Algorithm Flow in a Workbook Canvas. ...Using Filters
When you plot a chart, all the data in the dataset is not required to be used. Also, within the data used, there might be sub-categories that you want to plot separately. You can view classified results in the charts using filters. Filters help you ...Using Variables in RubiPython
The variables defined at the workbook/pipeline level can be used in the RubiPython custom component. To use a user-defined variable in RubiPython, follow the steps given below. Create your algorithm flow. Refer to Building Algorithm Flow in a ...Using a Parameter
You can use the created parameter in any of the widgets on the dashboard. You can change the values in the selected Calculated Column based on the value of the selected Parameter. Using a Numerical Parameter To use a created Numerical Parameter, ...Using Parameters in RubiSight
In RubiSight, two types of user-defined values are available, Calculated Column Parameters A Calculated Column is created as a new column created that was not a part of the original dataset. The new column is related to one (or more) of the existing ...