Add Cache Calculated Column
Rubiscape allows you to create a Cache Calculated Column in the dashboard. It has similar functionality as the Calculated Column. While creating a Cache Calculated Column, a cache file is generated. After every update in the source file or calculated column, this cache file will get updated.
To add a Cache Calculated Column, follow the steps given below:
- Open the Dashboard in edit mode. Refer to Editing a Dashboard.
The dashboard is displayed. - Add a dataset to the dashboard. Refer to Adding Dataset in RubiSight.
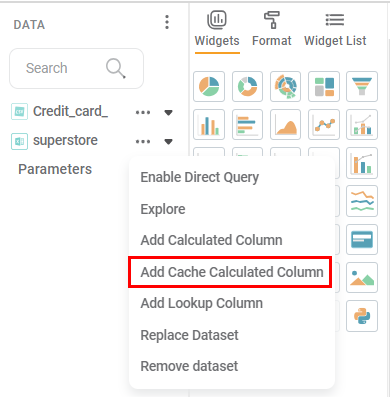
- In the DATA pane, click the ellipsis corresponding to the dataset and click "Add Cache Calculated Column".
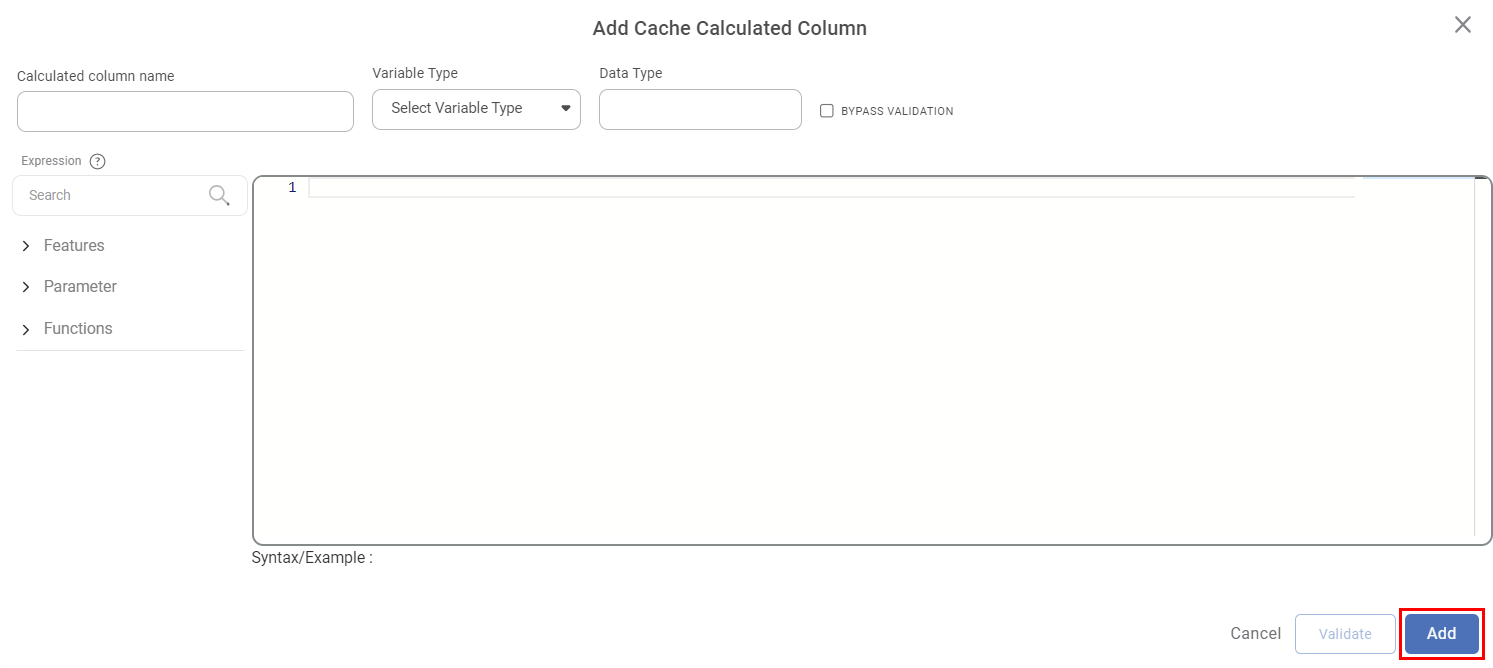
- Add Cache Calculated Column screen is shown.
- Enter the Calculated Column Name.
- Select the Variable Type from the drop-down. This step is optional. If you do not select the variable type, the system defines it with the click of Validate.
- In the Expression Code Editor window, enter the desired expression.
- Once the expression is ready, validate the expression. Click Validate.
- To add the new cache calculated column, Click Add.
The new cache calculated column is added to the dashboard and is displayed in the list with a symbol.
|
|
Related Articles
Add Lookup Column in Dashboard
The Lookup feature helps you to match the values between two or more data sources. It is used to determine the presence of a particular field from one data source to another. The Lookup functionality in Rubiscape allows you to connect two data ...Adding Calculated Column to Dashboard
To add a calculated column to your dashboard, follow the steps given below. Open the Dashboard in edit mode. Refer to Editing a Dashboard. The dashboard is displayed. Add a dataset to the dashboard. Refer to Adding Dataset in RubiSight. In the DATA ...Adding Calculated Column to Dataset
The created Parameter can be used in the Dashboard on any page. To use the Parameter, we first create a Calculated Column based on the Parameter. To create a Calculated Column, follow the steps given below. Open the Dashboard in edit mode. Refer to ...Editing Calculated Column
You can edit the calculated column. To edit a calculated column, follow the steps given below. Open the Dashboard in edit mode. Refer to Editing a Dashboard. The dashboard is displayed. In the DATA pane, locate the required dataset and then click the ...Deleting Calculated Column
You can delete the calculated column from the dashboard. To delete a calculated column, follow the steps given below. Note: The calculated column is displayed with a copyright symbol () next to it. Open the Dashboard in edit mode. Refer to Editing a ...