Add Lookup Column in Dashboard
The Lookup feature helps you to match the values between two or more data sources. It is used to determine the presence of a particular field from one data source to another. The Lookup functionality in Rubiscape allows you to connect two data sources and compare them based on certain conditions. Lookup checks all the values in the given data sources and matches the records from one data source to another for the selected fields.
To add a lookup column in a dataset in the dashboard, follow the steps given below:
- Open the Dashboard in edit mode. Refer to Editing the Dashboard.
The Dashboard is displayed. - Add a dataset to the Dashboard. Refer to Adding a dataset to the dashboard.
- In the DATA pane, click the ellipsis corresponding to the dataset, and then click Add Lookup Column from the listed options.
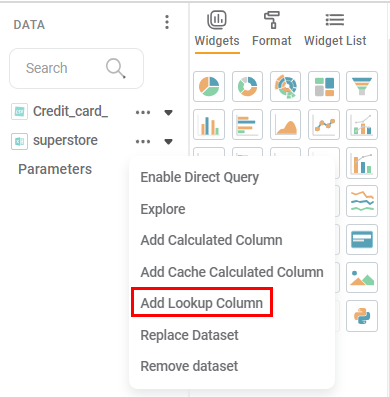
The Add Calculated Column page is displayed.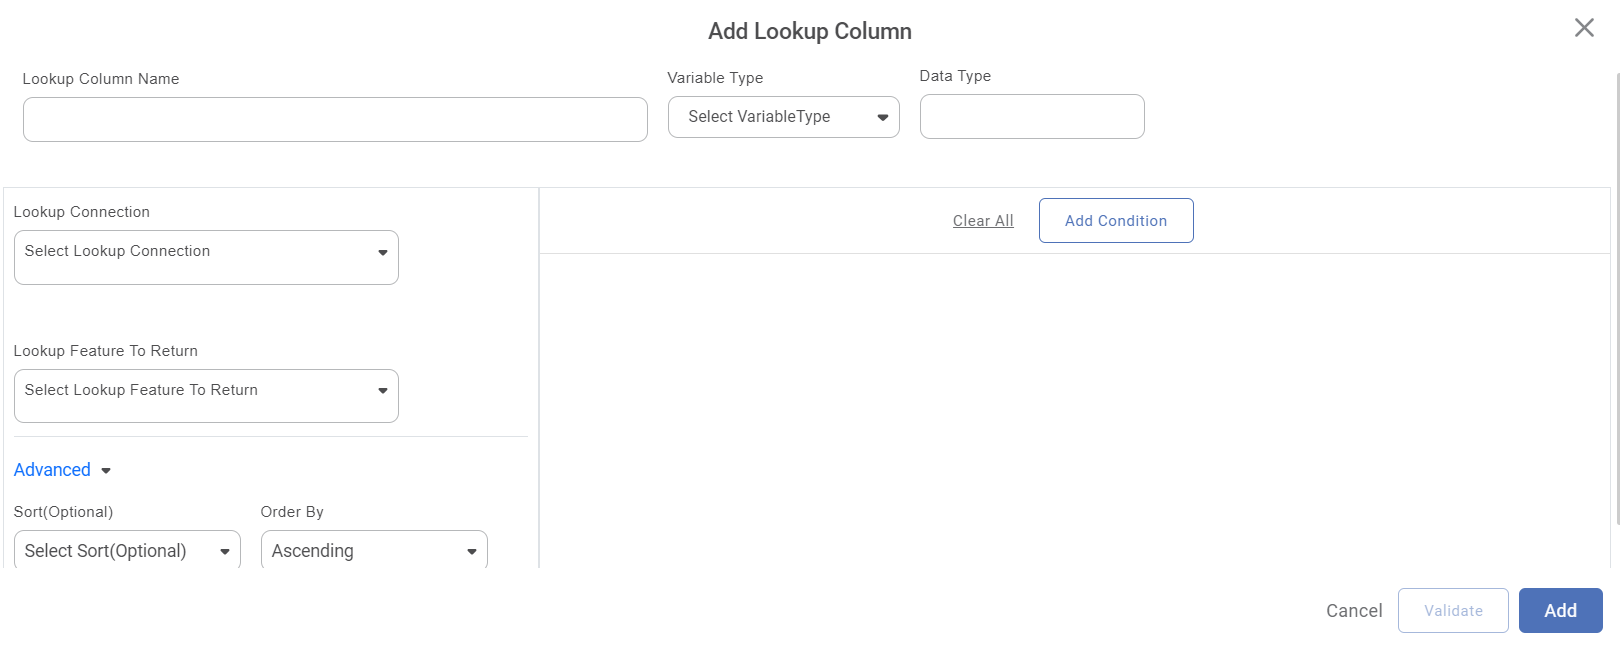
- Enter the Lookup Column Name.
- Select the Variable Type from the dropdown. The available options are Categorical, Numerical, and Interval.
- Select the Lookup Connection dropdown to connect another dataset.
- Click the Lookup Feature To Return dropdown to select the feature column from the chosen dataset in the Lookup Connection.
- Select the Add Condition button to create an expression.
- From the Lookup Feature drop-down, select a feature of the lookup dataset.
From the Condition drop-down, select the comparison operator. Available operators are
.png)
- Select the Input Feature to select the value from the dataset where you want to add the Lookup column.
- Click on Validate to validate the Expression.
- After validating the expression, click Add to add the lookup column. A Lookup Column is created in the existing dataset.
Related Articles
Add Cache Calculated Column
Rubiscape allows you to create a Cache Calculated Column in the dashboard. It has similar functionality as the Calculated Column. While creating a Cache Calculated Column, a cache file is generated. After every update in the source file or calculated ...Lookup
Lookup is located under Model Studio ( ) in Data Preparation, in the left task pane. Use the drag-and-drop method to use the feature in the canvas. Click the feature to view and select different properties for analysis. Refer to Properties of Lookup. ...Lookup
Lookup is located under Model Studio ( ) in Data Preparation, in the left task pane. Use the drag-and-drop method to use the feature in the canvas. Click the feature to view and select different properties for analysis. Refer to Properties of Lookup. ...Adding Calculated Column to Dashboard
To add a calculated column to your dashboard, follow the steps given below. Open the Dashboard in edit mode. Refer to Editing a Dashboard. The dashboard is displayed. Add a dataset to the dashboard. Refer to Adding Dataset in RubiSight. In the DATA ...Configuring Dashboard from Mobile View
Refer Navigate Mobile View to access the Mobile View. Refer Mobile View introduction for getting details of the sections available in the Mobile View and why this configuration is required. Navigate to Mobile View of canvas for configuring dashboard ...