Projects
Project is a series of tasks performed by users and groups in a specific order to reach a definite pre-defined outcome. The number of resources required to run a project varies according to its scope and complexity.
In the case of Projects, you can
- Search, Add, Edit, Export, and Delete a Project
- Add Users and Groups to the Project
- Edit Access Control of the Project
|
|

The image below shows the contents below the Projects tab.
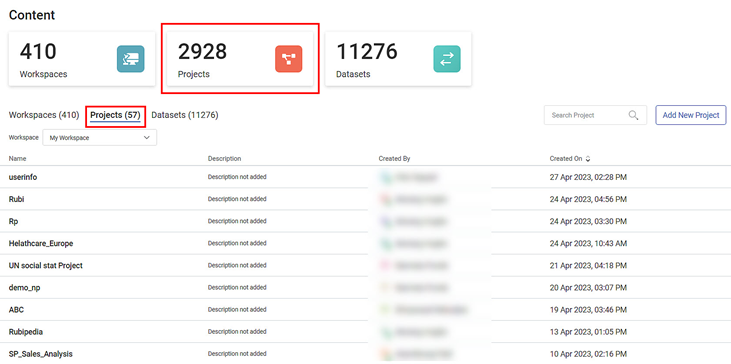
The following table explains various fields on the Projects tab.
Field/Icon | Description |
|---|---|
 | Projects KPI Card
|
Projects (Number) | Projects List Tab
|
Workspace Drop-down | Select a workspace whose projects you want to see in the list. |
Search Project |
|
Add New Project |
|
 | Menu Icon
|
Adding a New Project
To add a project,
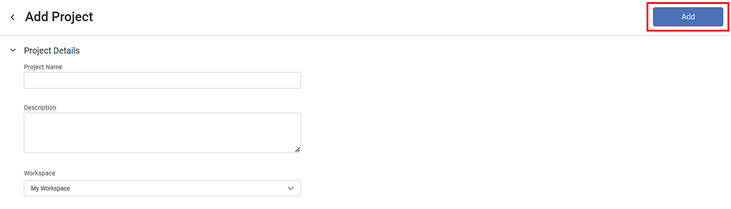
- In the Project tab, click Add New Project on the extreme right. The Add Project page is displayed. It contains two sections, viz: Project Details and Access Control.
- In the Project Details section, add Project Name and Description.
- From the Workspace drop-down, select the Workspace to which you want to add the project.
- Click Add in the top-right corner. The newly created Project appears in the projects list on the Contents page.
Searching for a Project
Searching for a project from a long list can be time-consuming. The Search Project field helps to search for your desired project quickly.
To search for a project,
- In the Projects tab, click inside the Search Project field.
- Type the name of the project you want to search.
Partial names are allowed for searching. A list of project names matching the search string is populated as you start typing.
Editing a Project
To edit a project,
- Hover over the project you want to edit,
- Click anywhere on the highlighted row and click Edit Project on the next page.
- Click on the menu icon (
 ) and click Edit. You are navigated to the Edit Project page.
- Make changes to the Project Name and Description as required.
- Click Save in the top-right corner. The updated project appears in the projects list on the Contents page.
| While editing a project, the Workspace field is DISABLED. You cannot change the Workspace of a project. |
Adding Users and Groups to a Project
As an administrator, you can add users and groups to a project. You can identify a user or a group from their icons.
 | User |
 | Group |
To add a user or a group,
- In the Project tab, search and navigate to the required Workspace.
- Click anywhere on the highlighted row and click Edit Project on the next page. Alternatively, click on the menu icon (
 ) and click Edit Access Control. You are navigated to the Edit Project page.
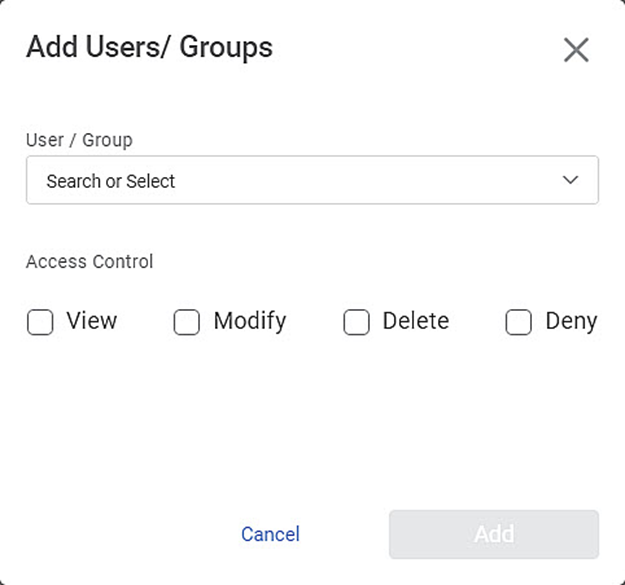
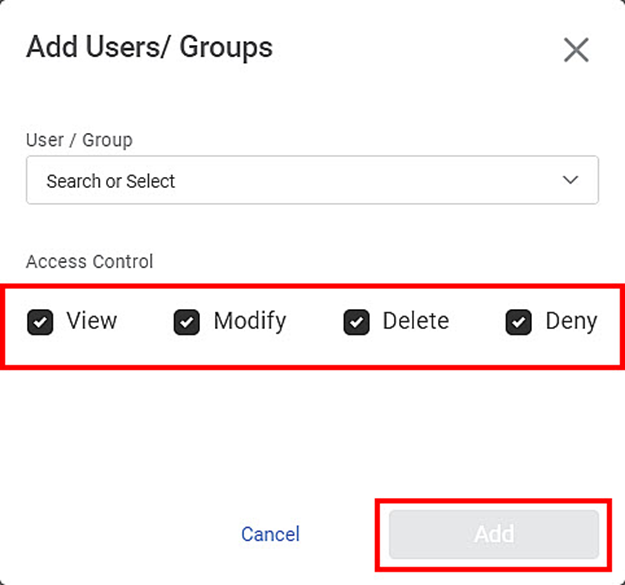
 - Click Add Users/Groups on the extreme right in the Access Control section. The Add Users/Groups page is displayed.
- Click the Search/Select drop-down.
- To select the users and groups,
- Scroll down the list and add users or groups as required by selecting the corresponding checkboxes or
- Type the names of users or groups you want to select in the search field or
- Select the Select All check box for all users and groups.
- After you have selected the required users and groups, click Add. The added users and groups list is displayed in the Access Control section.
- Click Save in the top-right corner. The selected users and groups are added to the project.
Providing Access To Project
As an administrator, you can control a user's (or group's) access to a project. By default, access to a project gives access to the following entities.
- Workbook
- Workflow
- Dashboard
The access to datasets is separately managed.
You can give access to modify, view, and delete a project. Also, you can deny any of these accesses to users or groups.
You can provide access to users and groups while
- Creating a new project
Editing an existing project
Acess
Users/Groups can
Additionally, Users/Groups can
View
Only view a project
–
Modify
Modify a project
View a project
Delete
Delete a project
View and Modify a project
Deny
NOT modify, view, or delete a project
–
To provide access,
- Follow steps 1 to 6 in Adding Users and Groups to a Project.
- Select the access permission checkboxes for the controls you want to provide.

- Alternatively, to provide identical access controls to all the selected users and groups, select the access permission checkboxes directly on the Add Users/Groups page.
- Click Save in the top-right corner. The access controls are applied to the selected users and groups.
| In the Access Control section, you can identify a
|
Removing Access Control For Project
As an administrator, you can control a user's or group's access to a project. You can remove the access to modify, view, and delete a project.
You can remove access to users and groups while editing an existing project.
To remove access,
- In the Project tab, select the Workspace to which your project belongs.
- Search and navigate to the required project.
- Click anywhere on the highlighted row and click Edit Project on the next page. Alternatively, click on the menu icon (
 ) and click Edit Access Control. You are navigated to the Edit Project page.
 - As required, in the Access Control section, clear the checkboxes for Modify, View, and Delete options for the user/group. The individual user's or group's access permissions are removed.
- If you want to remove a user or group from the list, hover over the user/group and click the Delete icon (
 ) on the extreme right.
 - Click Save in the top-right corner. The modified selections are saved for the project.
Exporting a Project
Exporting a project is saving the project on your system. The exported project is saved in a .DAT file format. This project can be used again by importing it into rubiscape.
To export a project,
- In the Project tab, select the Workspace to which your project belongs.
- Search and navigate to the required project.
Click anywhere on the highlighted row and click Export on the next page. Alternatively, click on the menu icon (
 ) and click Export. The project is saved to your default download folder.
- Select the destination folder, and then click Save.
Tip | You might be prompted to select the location based on your browser settings. |

Deleting A Project
As an administrator, you can delete a project that is no longer required.
|
|

To delete a project,
- In the Project tab, select the Workspace to which your project belongs.
- Search and navigate to the required project.
- Hover over the project you want to delete,
- Click anywhere on the highlighted row and click Delete Project on the next page.
- Click on the menu icon (
 ) and click Delete. A confirmation message to delete the project pops up.
- Click Delete on the message. The project is deleted, and a confirmation message is displayed.
Related Articles
Working with Projects
Key Elements in a Project Project cannot be created separately. Therefore, there are no dedicated steps to create a project. A project includes all your project elements, Workbook Workflow Models Dashboard Consider adding your dataset first that can ...Editing a Project
You can edit the existing project to change the name and description of it. The project name should be distinct if the project with the same name already exists. To edit a project, follow the steps given below. Open the Workspace that includes your ...Understanding Project Display Pane
The project display pane displays the projects created in the selected workspace. You can perform the list of actions as mentioned below. Visit the respective section for more information. Import Project Edit Project Export Project Delete Project To ...Opening a Project
You can open a project and further continue to work in the workbook or workflow present in the project. Note: Make sure you are in the correct workspace, which includes the project that you want to open. To open a project, follow the steps given ...Managing Datasets
What is Reader In rubiscape, a reader is referred to as a dataset. Dataset is a collection of elements extracted from different sources that can be integrated into one. The datasets added can be shared across different Projects. They are used to ...