Roles
Role is the function assumed and responsibility carried by a user. Initially, when users are assigned to a group, they are identified in a new role. A user can perform multiple roles in a project. The role title and its affiliated responsibilities depend upon the organization and may change with every organization.
Examples: Data Scientist, Data Visualizer, Data Engineer, New Customer, and so on.
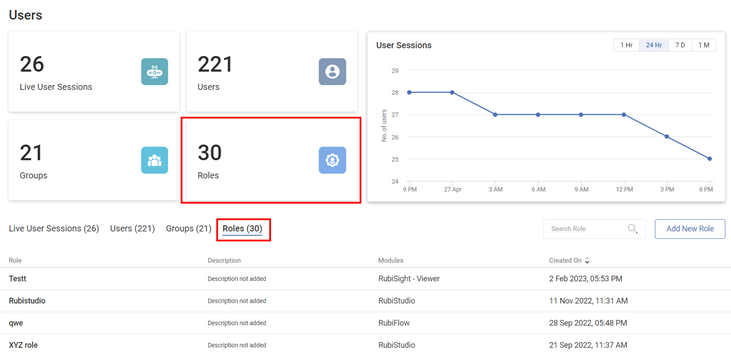
The image below shows the contents of the Roles tab.
The following table explains various fields on the Roles tab.
Field/Icon | Description |
|---|---|
 | Role KPI Card
|
User Sessions | User Session Chart
|
Roles (Number) | Roles List Tab
|
Search Role |
|
Add New Role |
|
 | Menu Icon
|
Adding a Role
You can add roles as required. Make sure to provide a suitable name and description to easily identify the role and its purpose.
To create a role,
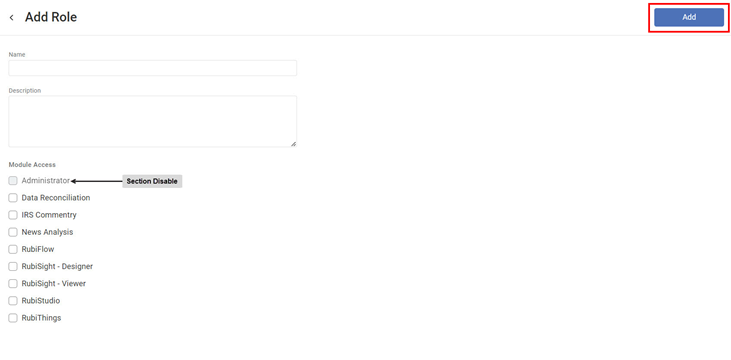
- In the Roles tab, click Add New Role on the extreme right. The Add Role page is displayed.
- Enter a suitable Name and Description for the role.
- Select the checkboxes corresponding to modules you want to assign to the role from the Module Access list.
- Click Add Role in the top-right corner. The newly added role appears in the Roles list on the Users page.
|
|

Searching a Role
Searching for a role from a long list can be time-consuming. The Search Role field helps to search for your desired role quickly.
To search for a role,
- In the Roles tab, click inside the Search Roles field.
- Type the name of the role you want to search for. Partial names are allowed for searching. A list of role names matching the search string is populated as you start typing.
Editing a Role
You can edit a role to change the name and description or change the module access it gives to the users.
To edit a role,
- Hover over the role you want to edit,
- Click anywhere on the highlighted row and click Edit Role on the next page.
- Click on the menu icon (
 ) and click Edit. You are navigated to the Edit Role page.
 - Make changes to the role details as required. You can add or remove the module access privilege by selecting or clearing the corresponding checkboxes.
- Click Save on the top-right corner. The updated role appears in the roles list on the Users page.
Role Module Access
When a role is assigned to a user, the user has the privilege to access certain applications or modules. These applications or modules are associated/affiliated with a particular role. These are listed under Module Access on the Add Role or Edit Role page. As an administrator, you can provide or remove access to these applications as and when required. Refer to Adding a Role.
Following is the list of Module Access privileges assigned to a role.
- Administrator
- RubiFlow
- RubiSight – Designer
- RubiSight – Viewer
- RubiStudio
- RubiThings
|
|
Deleting a Role
You can delete roles that are no longer required. Deleting redundant roles avoid the accumulation of unnecessary roles.
To delete a role,
- In the Roles tab, select and navigate to the role you want to delete.
- Hover over the role, click anywhere on the highlighted row and click Delete Role on the next page. Alternately, click on the menu icon () and click Delete. A confirmation message to delete the role pops up.
- Click Delete on the message. The role is deleted, and a confirmation message is displayed.
| Role mapped to any of the users cannot be deleted. |
Related Articles
Users
You can view your Tenant's users, groups, and roles in the User space. The four clickable KPI Cards for Live User Sessions, Users, Groups, and Roles take you to the respective tabs on the User Page. You can see a User Sessions chart on each of the ...Managing Licensing
Rubiscape offers its data science platform as a service to its clients. When you purchase a Rubiscape license, Rubiscape assigns a unique license key to you. Following is the exhaustive list of Module Access privileges that the client may receive ...Managing Tenants
Tenant is a non-human entity that governs users, groups, roles, workspaces, projects, and datasets. Tenant is created and governed by a Super Admin. Each tenant has at least one admin who governs its entities. You can view all, active and inactive, ...Managing Users
You can view your Tenant's users, groups, and roles in the User space. The four clickable KPI Cards for Live User Sessions, Users, Groups, and Roles take you to the respective tabs on the User Page. You can see a User Sessions chart on each of the ...Understanding the RubiThings Homepage
The RubiThings home page is the default page assigned to you to visualize the overall activity occurring in your workspace. When you log in for the first time, the home page canvas is blank. That's because you have not configured any "Thing." You see ...