Workflows
The contents of the workflows tab are shown below.
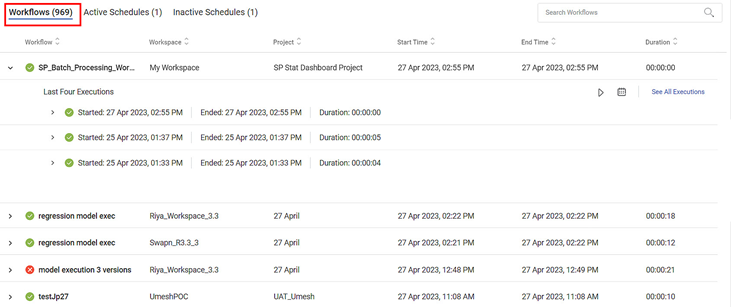
The following table explains various elements on the Workflows tab.
Field/Icon | Description | ||||||||
|---|---|---|---|---|---|---|---|---|---|
Workflows (Number) | Workflow List Tab
| ||||||||
Search Workflows |
| ||||||||
| Expand/Collapse Arrow
| ||||||||
Log |
| ||||||||
Trace |
| ||||||||
| Run Icon
| ||||||||
| Run From Failed Task Icon
| ||||||||
| Create Schedule Icon
| ||||||||
| See All Executions | Click to see all the executions of the selected Workflow. |


Active Schedules
The contents of the active schedules tab are shown below.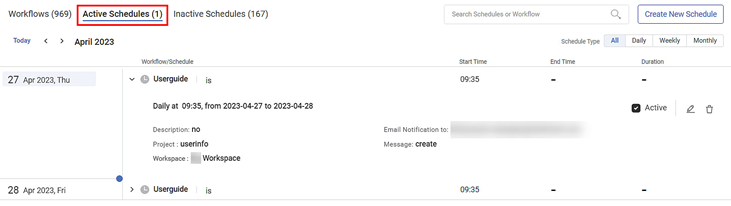
The following table explains various elements on the Active Schedules tab.
Field/Icon | Description | ||||||||
|---|---|---|---|---|---|---|---|---|---|
Active Schedules (Number) | Active Schedules Tab Displays a list and details of all active schedules in the selected Workspace (s) and Project (s). | ||||||||
| Search Schedules or Workflow |
| ||||||||
| Create New Schedule |
| ||||||||
| Click to view the active workflow schedules on the current date. | ||||||||
| Previous Week Arrow | ||||||||
| Next Week Arrow | ||||||||
| April 2022 | Current week/month indicator | ||||||||
| Schedule Type |
| ||||||||
04 April 2022, Mon | Current Date View all the active schedules on this date| | ||||||||
Scheduling_27_4 | The name of the workflow | ||||||||
Schedule_27 | The name given to the workflow schedule while creating a schedule | ||||||||
| Yet To Start (Active Workflow Status)
| ||||||||
 |
| ||||||||
| Edit/Update Schedule Icon
| ||||||||
| Delete Schedule Icon
| ||||||||
Description | View the description given at the time of Creating or Updating the Schedule | ||||||||
Project | View the name of the Project to which the Workflow belongs | ||||||||
Workspace | View the name of the Workspace to which the Workflow belongs | ||||||||
Email Notification to | View the email(s) address(es) of associates to which the schedule is dispatched along with the message. | ||||||||
Message | View the message you send in the email body. | ||||||||
| Time Indicator Bar |


Inactive Schedules
The contents of the inactive schedules tab are shown below.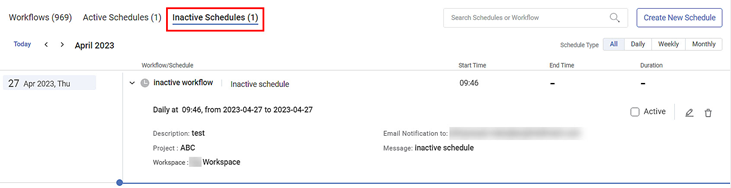
The following table explains various elements on the Inactive Schedules tab.
Field/Icon | Description | ||||||||
|---|---|---|---|---|---|---|---|---|---|
Inactive Schedules (Number) | Inactive Schedules Tab
| ||||||||
| Search Schedules or Workflow |
| ||||||||
| Create New Schedule |
| ||||||||
| Click to view the inactive workflow schedules on the current date. | ||||||||
| Previous Week Arrow | ||||||||
| Next Week Arrow | ||||||||
April 2022 | Current week/month indicator | ||||||||
Schedule Type |
| ||||||||
28 March 2022, Mon | Current Date
| ||||||||
| Yet To Start (Inactive Workflow Status)
| ||||||||
workflow_schedule | The name of the workflow | ||||||||
Work_schedule_updated | The name given to the workflow schedule while creating a schedule | ||||||||
|
| ||||||||
| Edit/Update Schedule Icon
| ||||||||
| Delete Schedule Icon
| ||||||||
Description | View the description given at the time of Creating or Updating the Schedule | ||||||||
Project | View the name of the Project to which the Workflow belongs | ||||||||
Workspace | View the name of the Workspace to which the Workflow belongs | ||||||||
Email Notification to | View the email(s) address(es) of associates to which the schedule is dispatched along with the message. | ||||||||
Message | View the message you send in the email body. |

Searching a Workflow
The search function is useful when the list of workflows is long. You can search a workflow from
- Workflow drop-down
- Workflow Tab
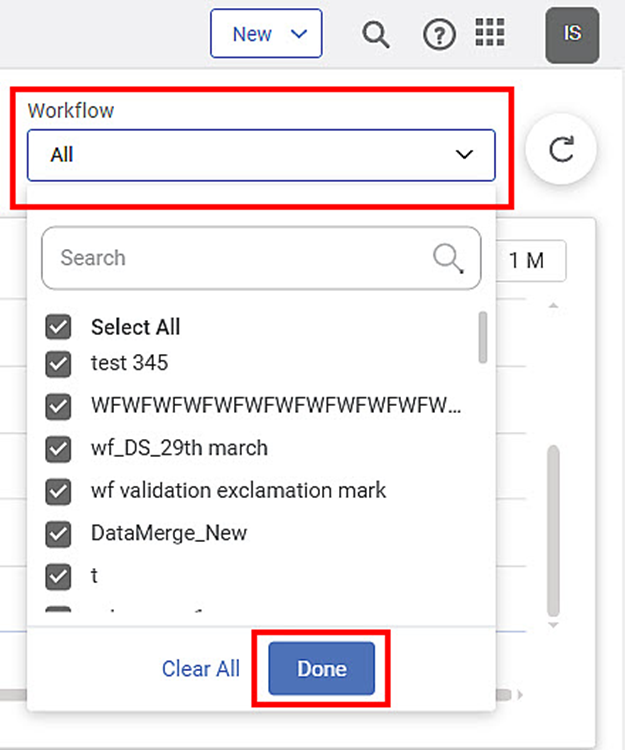
From Workflow Drop-down
To search for a workflow,
- On the Workflow Monitoring page, below the title pane, click the Workflow drop-down.
- Scroll down to search your Workflow from the list.
- Alternatively, type the name of the Workflow in the Search field. Partial names are allowed for searching. A list of workflow or schedule names matching the search string is populated as you start typing.
- Select the Workflow and click Done.
From Workflow Tab
To search for a workflow,
- On the Workflow Monitoring Page, in the Workflows tab, scroll down to search your Workflow from the list.
- Alternatively, type the Workflow name in the Search field on the extreme right. Partial names are allowed for searching. A list of workflow or schedule names matching the search string is populated as you start typing.

Creating a New Workflow Schedule
You can create workflow schedules as required. You can create
- A schedule for a particular workflow from the Workflow tab
- A new schedule from the Active Schedules or Inactive Schedules tab
From Workflow Tab
To create a schedule for a particular workflow,
- On the Workflow Monitoring Page, in the Workflows tab, scroll down to search the Workflow for which you want to create a schedule.
- Click the Expand/Collapse arrow (
 ) to the left of the workflow name.
 - Click the Create Schedule icon (
 ). The Create Schedule page is displayed.
 - Fill in the required details and click Create.
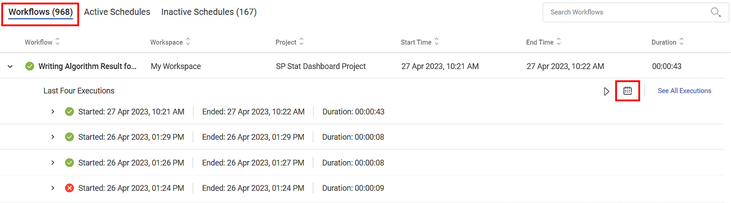
The Create Schedule Page is described below.
From Active/Inactive Schedules Tab
To create a new schedule,
- On the Workflow Monitoring Page, click Active Schedules or Inactive Schedules.
- Click Create New Schedule on the extreme right. The Create Schedule page is displayed.
- Fill in the required details and click Create.

The Create Schedule Page is described below.
Create Schedule Page
The Figure below shows the various fields and buttons on the Create Schedule page.
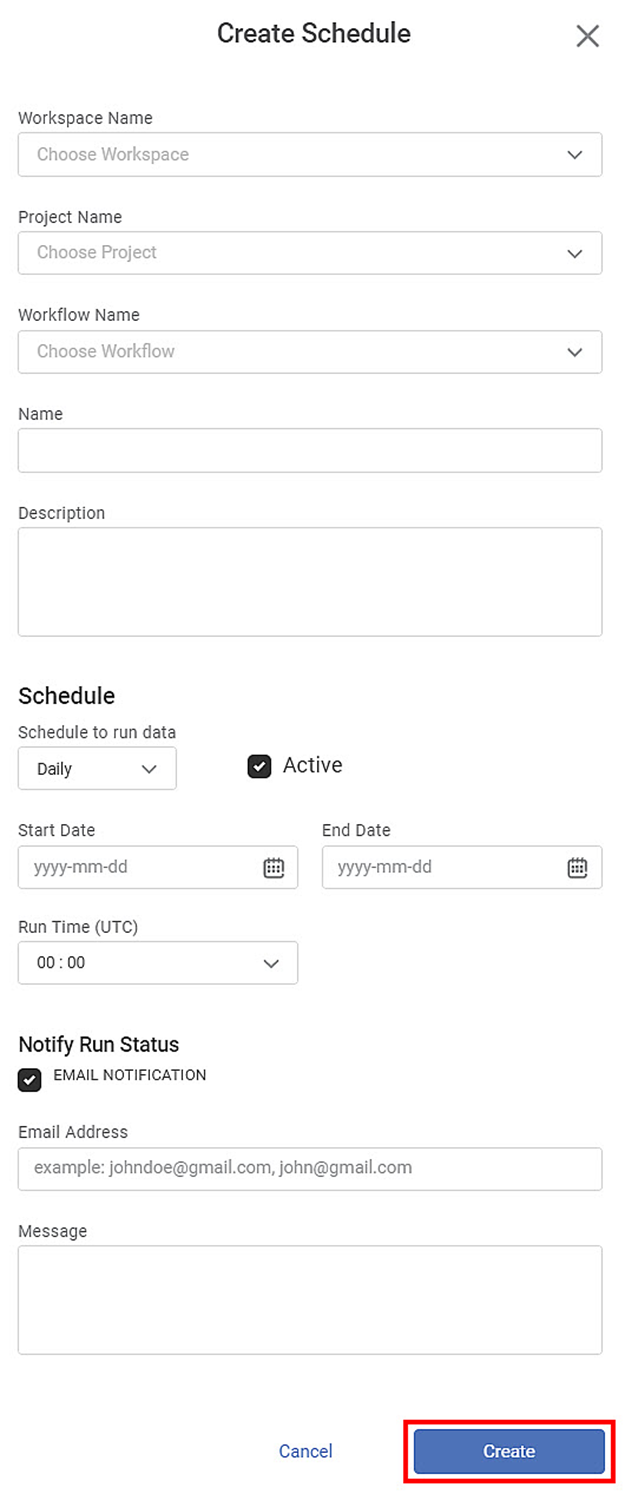
The table below describes the fields and buttons on the Create Schedule page.
Field/Icon | Description |
|---|---|
Workspace Name |
|
Project Name |
|
Workflow Name |
|
Name |
|
Description | Enter a suitable description for your schedule. |
Schedule | |
Schedule to run data | Select a frequency to run your Workflow
|
Active |
|
Start Date |
|
End Date |
|
Run Time |
|
Notify Run Status | |
EMAIL NOTIFICATION |
|
Email Address |
|
Message | Enter a message you want to send in the email body. |
Cancel | Cancel the schedule creation and return to the Workflow Monitoring page. |
Create | Click to create a workflow schedule. |
| While creating a Schedule, please note that ALL FIELDS ARE MANDATORY! |

Editing a Workflow Schedule
You can edit a schedule after it is created and in the active or inactive schedule state.
To edit a schedule,
- On the Workflow Monitoring Page, click Active Schedules or Inactive Schedules.
- Click the Expand/Collapse arrow (
 ) to the left of the workflow/schedule that you want to edit/update.
 - Click the Edit Schedule icon (
 ). The Update Schedule page is displayed. This page is identical to the Create Schedule Page.
 - Edit the fields as required. Refer to the table above to create a schedule.
- Click Update. The schedule is updated, and a notification message is displayed.
Deleting a Workflow Schedule
You can delete a schedule when it is no longer needed.
To delete a schedule,
- On the Workflow Monitoring Page, click Active Schedules or Inactive Schedules.
- Click the Expand/Collapse arrow () to the left of the workflow/schedule you want to delete.
- Click the Delete icon (
 ). A message to confirm your action is displayed.
 - To confirm, click Delete. The selected schedule is deleted, and a confirmation message is displayed.
Related Articles
Managing Workflows
You can schedule workflows to run at pre-decided time intervals as an administrator. The scheduled workflows execute at the set time without any user intervention. It makes the automation of certain processes easier. You can Create new schedules Run ...View Workbooks and Workflows in Running Status
In a workspace, there are some workbooks and workflows that are still in running mode. They are easy to locate from the home page using the Running tab. You can also filter the status as Failed, Aborted, and Completed Workbooks and Workflows. Click ...View Workbooks and Workflows in Running Status
In a workspace, there are some workbooks and workflows that are still in running mode. They are easy to locate from the home page using the Running tab. You can also filter the status as Failed, Aborted, and Completed Workbooks and Workflows. Click ...Opening a Workflow
To open a workflow, follow the steps given below. On the home page and click Workflows. Recent Workflows for the selected workspace are displayed. Hover over the workflow you want to open and click the workflow tile. Your selected workflow canvas is ...Deleting a Workflow
To delete a workflow, follow the steps given below. On the home page, click Workflows. Recent Workflows for the selected workspace are displayed. Hover over the workflow you want to delete, click the vertical ellipsis (); and then click Delete. A ...