Working with Dataset Operations
In Data Dictionary, the features of the selected dataset are displayed in the PREVIEW pane. You can perform some operations on these features to show/hide them, modify them, change/view the properties, and so on.
Performing Dataset Operations
To perform the dataset operations, follow the steps given below.
- Select the dataset from the data dictionary canvas.
The selected dataset has a blue highlight around it. Here, the dataset NewCustomerInfo is selected. - Click PREVIEW at the bottom of the data dictionary canvas.
The PREVIEW pop-up is displayed.
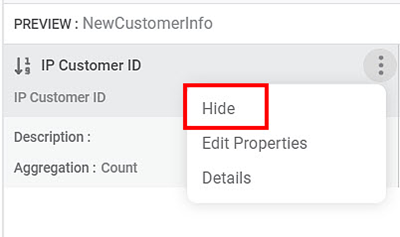
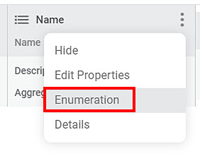
The features of the dataset NewCustomerInfo are displayed in the PREVIEW pane. In the PREVIEW pane, hover over the dataset column, and click the ellipsis (
 ) corresponding to the dataset column to perform dataset operations.
The list of available dataset operations is displayed.Select the desired operation as per your requirement from the list to modify your dataset.
These operations are shown in the figure below.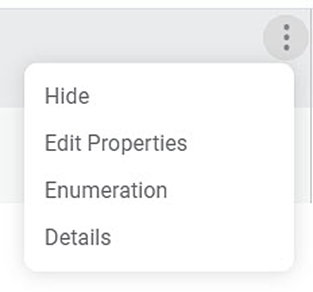
Notes: |
|
These operations are explained in detail in the following sections.
Hiding a Feature
You can hide one of the features in the selected dataset node from the PREVIEW pane. Hiding a feature conceals it from your view. You can also unhide the feature you have hidden.
To hide a feature, follow the steps given below.
- Select the dataset from the data dictionary canvas.
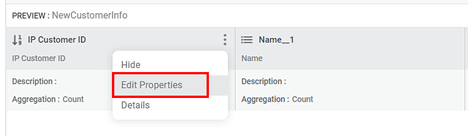
The features of the dataset are displayed in the PREVIEW pane. To view the PREVIEW pane, refer to Performing Dataset Operations. - Click the ellipsis () corresponding to the feature you want to hide.
A list of options is displayed. - Click Hide.
The feature is hidden from the view, as shown in the figure below.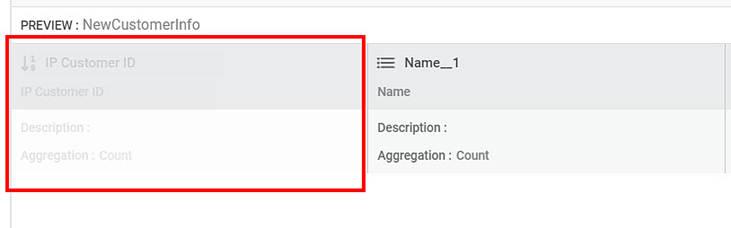
- Click the Save icon (
 ) on the top right corner of the Data Dictionary page to save the change to the data dictionary.
Showing a Hidden Feature
To show the hidden feature, follow the steps given below.
- Select the dataset from the data dictionary canvas.
The features of the dataset are displayed in the PREVIEW pane. To view the PREVIEW pane, refer to Performing Dataset Operations. - Click the ellipsis () corresponding to a hidden feature you want to unhide.
A list of options is displayed. - Click Show.
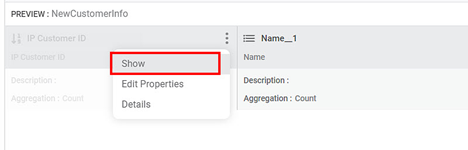
The feature is displayed back in dataset PREVIEW, as shown in the figure below.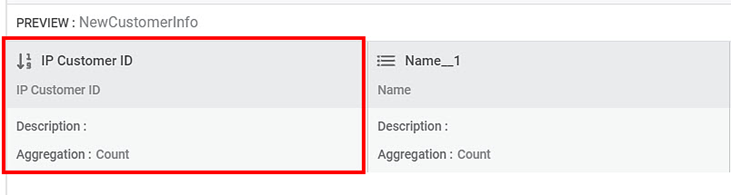
- Click the Save icon () on the top right corner of the Data Dictionary page to save the change to the data dictionary.
Editing Properties of a Feature
You can edit the properties of any feature in the selected dataset in the PREVIEW pane. To edit the properties of a feature, follow the steps given below.
- Select the dataset from the data dictionary canvas.
The features of the dataset are displayed in the PREVIEW pane. To view the PREVIEW pane, refer to Performing Dataset Operations. - Click the ellipsis () corresponding to the feature you want to rename.
A list of options is displayed. - Click Edit Properties.
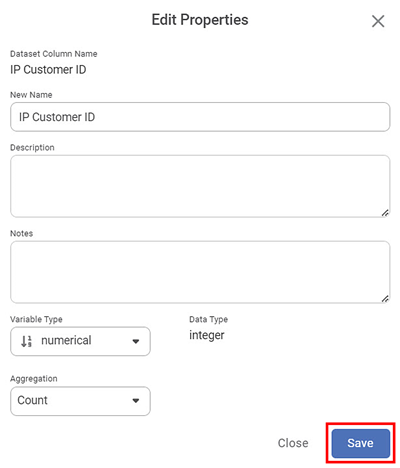
The Edit Properties page is displayed. Edit the properties as per your requirement and click Save. Refer to the Table below.
The feature is updated, and the new properties of the feature are displayed in the PREVIEW pane, as shown in the figure below.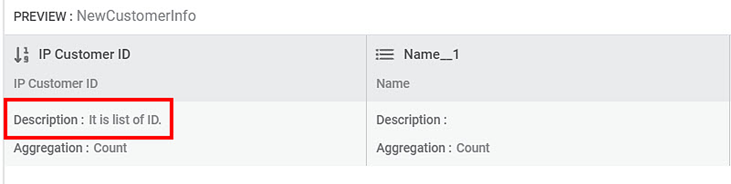
- Click the Save icon () on the top right corner of the Data Dictionary page to save the changes.
The table given below describes the fields on the Edit Properties page.
Property | Description | Remark |
|---|---|---|
DATASET COLUMN NAME | It displays the name of the column in the database. | — |
NEW NAME | It displays the name of the column in the business layer. | The DATASET COLUMN NAME and NEW NAME are the same if you do not change the feature name. |
DESCRIPTION | It displays the description of the dataset column. | This field is blank if you did not add any description. |
NOTES | It displays the notes about the dataset column. | This field is blank if you did not add any notes. |
VARIABLE TYPE | It displays the variable type of the feature. | The available options for variable type are:
|
DATA TYPE | It displays the data type of the feature. | You cannot edit this field. |
AGGREGATION | It displays the default aggregation for the selected feature. |
|
Adding Enumeration for a Feature
You can add enumeration to your dataset. Enumeration is adding short values for the original values of a feature.
For example, consider a dataset containing the list of country names in the world. Using the Enumeration feature, you can add codes for the country names in your dataset - USA for the United States of America, UK for the United Kingdom, IND for India, and so on.
Enumeration is especially helpful for the datasets with text data and many columns
Notes: |
|
You can select the type of enumeration you want to perform. There are two types of enumeration -
- Manual enumeration – Adding enumerated values manually
- CSV enumeration – Adding Enumeration values using a CSV file
The types of enumeration are explained in detail in the following sections.
Adding Manual Enumeration
You can add enumeration manually by adding enumerated values to a feature.
To perform manual enumeration, follow the steps given below.
- Select the dataset from the data dictionary canvas.
The features of the dataset are displayed in the PREVIEW pane. To view the PREVIEW pane, refer to Performing Dataset Operations. - Click the ellipsis () corresponding to the required feature.
A list of options is displayed. - Click Enumeration.
The Enumeration page is displayed.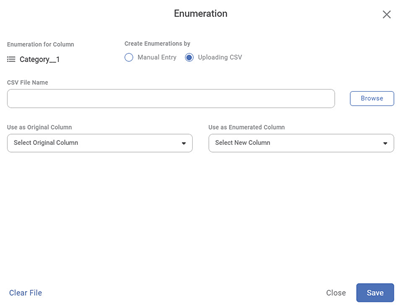
Select the Manual Entry radio button on the Enumeration page.
The fields to create manual enumeration are displayed.
Enter the new enumerated values you want to create in the Please enter new value field corresponding to each original value.
Click Save.
The Enumeration page is closed.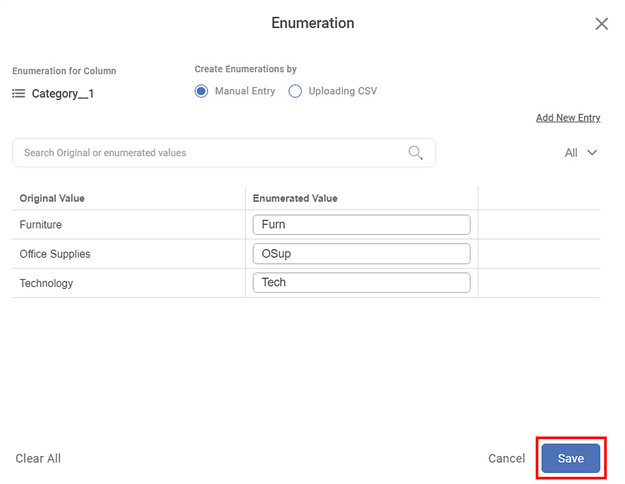
Click the Save icon (
) on the top right corner of the Data Dictionary page.
The newly created enumerated value is saved in the dataset.
Notes: |
|
CSV Enumeration
You can perform enumeration using a CSV file. To perform CSV enumeration, you need to create a CSV file with original and enumerated values and save it in your system.
To perform CSV enumeration, follow the steps given below.
- Select the dataset from the data dictionary canvas.
The features of the dataset are displayed in the PREVIEW pane. To view the PREVIEW pane, refer to Performing Dataset Operations. - In the PREVIEW pane, click the ellipsis () corresponding to the required feature.
The list of options is displayed. - Click Enumeration.
The Enumeration page is displayed. The Uploading CSV option is selected by default. - Click Browse to upload the CSV file containing original values and enumerated values from your system.
Click the Select Original Column field drop-down and select the original column from the available list.
Click the Select New Column field drop-down and select the new column from the available list.
Click Save.

The Enumeration page is closed.Click the Save icon (
) on the top right corner of the Data Dictionary page.
The newly created enumerated column is saved in the dataset.
Note: | To remove the selected CSV file and enumerated value, click the Clear File at the bottom left corner of the Enumeration page, and click Save. |
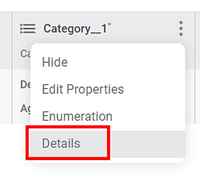
Viewing Details of a Feature
You can view the properties of any of the features. To view the properties of a feature, follow the steps given below.
- Select the dataset from the data dictionary canvas.
The features of the dataset are displayed in the PREVIEW pane. To view the PREVIEW pane, refer to Performing Dataset Operations. - Click the ellipsis (
 ) corresponding to the required feature.
A list of options is displayed. - Click Details.
The Details page is displayed. Refer to the Table below to understand the terms on the Details page. - Click (
 ) to close the Details page.
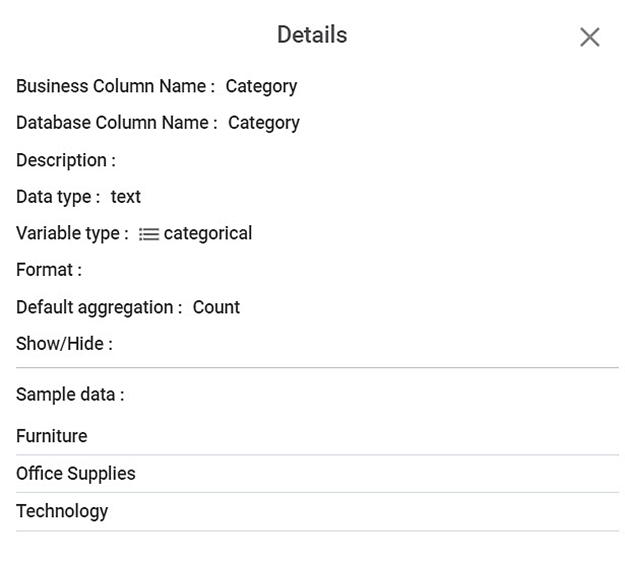
Figure: Feature Details Page
The Details page is closed, and you are redirected to the main Data Dictionary page.
The table given below describes the details of a feature.
Property | Description | Remark |
|---|---|---|
Business column name | It displays the name of the column in the business layer. | The Database column name and Business column names are the same if you do not change the feature name. |
Database column name | It displays the name of the column in the database. | — |
Description | It displays the description of the feature. | This field is blank if you did not add any description. |
Data type | It displays the data type of the feature. | The available options for variable type are:
|
Variable type | It displays the variable type of the feature. | The available options for variable type are:
|
Format | It displays the format of the feature if a feature is of interval type. For example, if a column contains Dates, then the format of date is displayed here. | It remains blank for other types of features. |
Default aggregation | It displays the default aggregation for the selected feature. |
|
Show/Hide | It displays whether the feature is hidden or not. If the value is true, then the feature is displayed. If the value is false, then the feature is hidden. | — |
Sample data | It displays up to ten unique entries in the dataset column as sample data. | In the Feature Details Page, only seven entries are displayed as there are no more unique entries in this dataset column. |
Related Articles
Working with AutoML in Rubiscape
Auto ML is a process that helps you to build models with the help of predefined datasets. You can select your datasets, the dependent, and the independent variables, and run the model. AutoML wizard suggests the best fit model for your dataset. ...Working with File Server
Understanding File Server Pane The File Server allows you upload files/ and folders on Rubiscape cloud storage for the current workspace. You can upload files of all formats and use them while creating a dataset or working with RubiNotebook or ...Adding a Dataset
A dataset is global and shared across the same workspace. Consider adding a dataset before creating a project. You can add a dataset from the supported data sources. The added datasets can be used in multiple projects. To add a dataset, follow the ...Refreshing Metadata of Dataset
Rubiscape supports the Metadata Refresh feature for datasets, as listed below. Google Spreadsheet dataset RDBMS dataset File type dataset from AWS S3 cloud storage Applicable to all flat files (Excel, CSV, JSON, Text) This feature is available in ...MLOPS - Machine Learning Operations
Introduction: Why Rubiscape MLOps? Rubiscape MLOps provides an end-to-end environment for building, tracking, publishing, and serving machine learning models. It ensures experiment reproducibility, streamlined deployment, and centralized model ...