Geographical Variables
In RubiSight, you can use Numerical, Textual, Interval, Categorical, and Geographical types of variables.
Creating a Dataset with Geographical Variable Type
To create a dataset containing a geographical variable type, follow the steps given below
Add a dataset that contains a geographical variable that defines a location. Refer to Adding a Dataset.
A message saying "Some features contain unmapped locations" is displayed.
The message is displayed for features that have unmapped locations.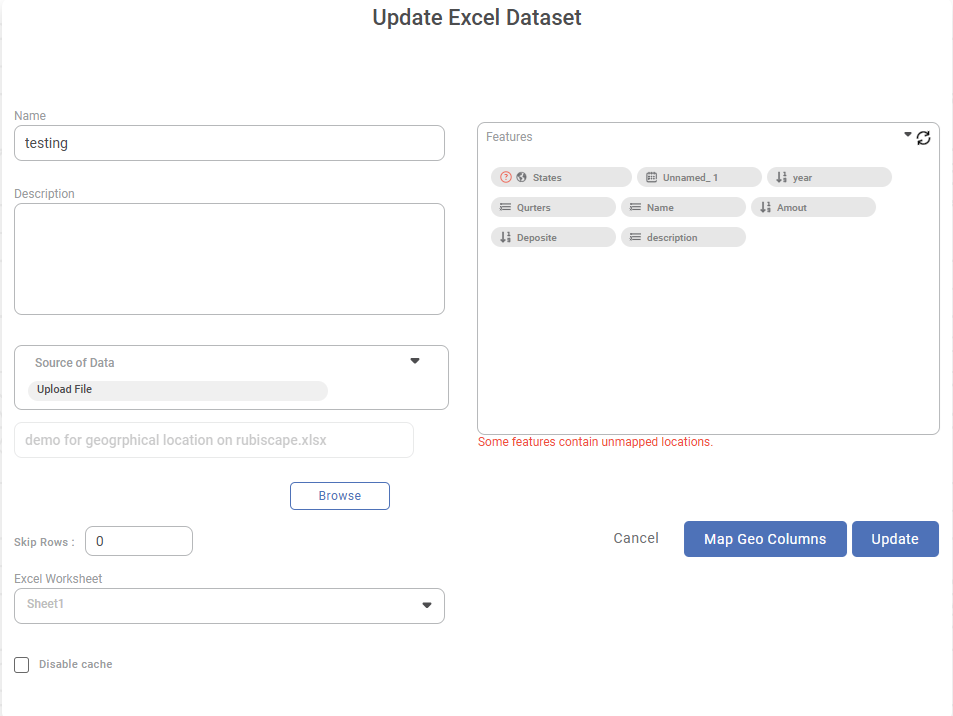
Notes:
In the figure above,
- Location is the feature name for which you want to configure the geographical variable type.
- In the example above, the feature Location is of geographical variable type.
- A question mark (
 ) next to the earth symbol (and the feature name) indicates the presence of unmapped locations.
- To map the unmapped locations, click Next.
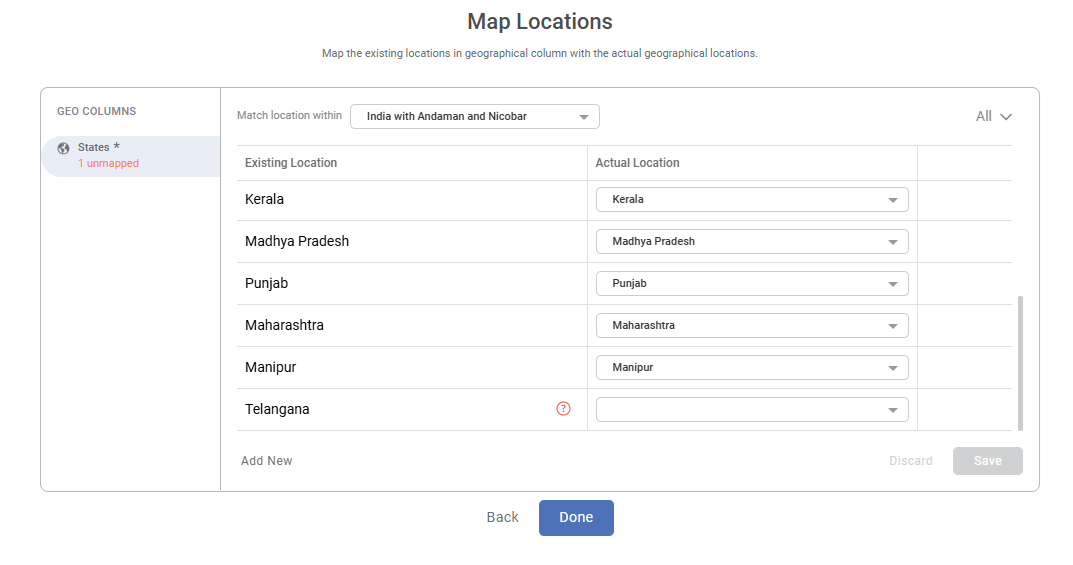
The Map Locations page is displayed.
The number of unmapped locations is displayed on the GEO COLUMNS pane. To map an unmapped existing location, select a location from the corresponding Actual Location drop-down.
Notes:
- You should map the location's name to the exact spelling of the region registered in the system.
- When you map locations, you can search the actual location by typing text in the field. Partial text is also allowed.
- To view only unmapped locations, select Unmapped from All drop-down on the top-right corner of the window.
- If the name of a region is correct but contains a special character, number, or any symbol, it is considered unmapped.
- For example, Telangana*** or Punjab1.
- Also, if any detail in the name of the location is written differently, it is considered unmapped.
- For example, Dadara and Nagar Haveli are written as Dadara & Nagar Haveli.
- If an existing location is marked as Unassigned, you can assign it to a suitable location (as per your judgment).
- For example, in Indian states' data, the locations marked as Unassigned and Cases being reassigned to states are mapped to NCT of Delhi.
- As locations are successfully mapped, the number of unmapped locations displayed below the feature name in the GEO COLUMNS pane decreases.
- When all locations are successfully mapped, you see the 'All mapped' message below the feature name.
Scroll down to view more unmapped locations.
The table below describes the various fields and buttons on the Map Locations page.Field
Description
Remark
GEO COLUMNS
This pane displays all the columns that are of geographical variable type.
- It displays the number of unmapped locations, if any.
- If all locations are mapped, it displays 'All mapped.'
Match location within
This drop-down field allows you to select the region or territory within which the mapped and unmapped locations may be situated.
- In real-time data containing regions, cities, states, territories not registered in the system, we can select them from the Match location within the field.
- For example, in India, three territories can be selected. These are,
- India
- India with Andaman and Nicobar (undisputed)
- India with disputed territories
- In India, if there are some states/regions that are not present in the system, select India with Andaman and Nicobar option. It maps the exact value for the current location value. It is essential in popular data values like
- UP for Uttar Pradesh
- DL for Delhi
- Telangana is still considered a part of Andhra Pradesh. If you want to select Telangana as an independent state, select India with disputed territories option.
Existing Location
It displays the list of all mapped and unmapped locations in the selected column.
The unmapped locations are highlighted with a question mark (
).Actual Location
It allows you to map the existing locations.
The unmapped locations are mapped using the actual locations registered in the system.
Location Filter
It allows you to view the existing locations in a dataset.
Two options available are,
- All (to view mapped and unmapped locations)
- Unmapped (to view only the unmapped locations)
Button
Description
Remark
Discard
It discards all the mapping selections.
The Map Locations page displays the original number of unmapped locations in the dataset, if any.
Save
It saves the mapped geographical locations to the dataset.
—
Back
It navigates you to the Create Dataset page.
—
Done
It completes the dataset creation process.
It navigates you to the Rubiscape home page.
- After you have mapped all locations, click Save.
All mapped is displayed under the feature name on the GEO COLUMNS pane. Click Done.
You are navigated to the Rubiscape home page.Notes:
- If you have some unmapped locations, the following confirmation message pops up.
The mapping of geographical locations for few columns are not complete. Do you still want to leave?- If you want to create the dataset with the unmapped locations, click Yes, Leave.
- You are navigated to the Rubiscape home page.
- If you want to map the remaining unmapped locations, click Cancel.
- You are navigated to the Map Locations page.
- You can explore the dataset to check the mapped locations in the dataset. Refer to Exploring a Dataset.
- In the Location column, the mapped values are observed to have replaced the unmapped values.
- The unmapped locations are marked with a warning symbol (
 ).
). - A warning message, "This value is unmapped," is displayed when you hover over the warning symbol.
- If you have some unmapped locations, the following confirmation message pops up.
Related Articles
Mapping Variables
In Rubiscape, you can create, train, test, and publish models for further use in workbooks or workflows. For this, we configure a model using a dataset. When you publish a trained model, it appears in the model section under Model Studio or Machine ...Mapping Variables
In Rubiscape, you can create, train, test, and publish models for further use in workbooks or workflows. For this, we configure a model using a dataset. When you publish a trained model, it appears in the model section under Model Studio or Machine ...Using Variables in RubiPython
The variables defined at the workbook/pipeline level can be used in the RubiPython custom component. To use a user-defined variable in RubiPython, follow the steps given below. Create your algorithm flow. Refer to Building Algorithm Flow in a ...Usage of Variables
In Rubiscape, you can add a variable at the workbook or workflow level. Refer to Adding a Variable. Rubiscape provides variable support, that is, its usage, for all tasks anywhere in workbooks or workflows like creating a dataset, performing data ...Usage of Variables
In Rubiscape, you can add a variable at the workbook or workflow level. Refer to Adding a Variable. Rubiscape provides variable support, that is, its usage, for all tasks anywhere in workbooks or workflows like creating a dataset, performing data ...