MinIO
MinIO is a high-performance, distributed object storage system. In Rubiscape, you have the capability to access files stored on MinIO storage to create datasets for analysis and processing. By configuring the necessary parameters, you can establish datasets and ensure they are automatically updated.
Before creating datasets using MinIO Storage, ensure you have the following information:
- MinIO Access Key: The access key required to authenticate access to your MinIO instance.
- MinIO Secret Key: The secret key associated with the access key for authentication purposes.
- MinIO Host: The hostname or IP address of your MinIO server.
- MinIO Bucket Name: The name of the bucket within your MinIO instance where datasets are stored.
- File Directory URL: The URL pointing to the directory containing the files you wish to include in the dataset. Always use "/" after the directory/folder name.
- Filename / Wildcard: The name of the file(s) or wildcard pattern to specify the files to be included in the dataset.
Creating Excel Dataset using MinIO
To create an Excel dataset by using MinIO storage, follow the steps given below.
- Follow steps 1 to 3 of Creating Excel Dataset.
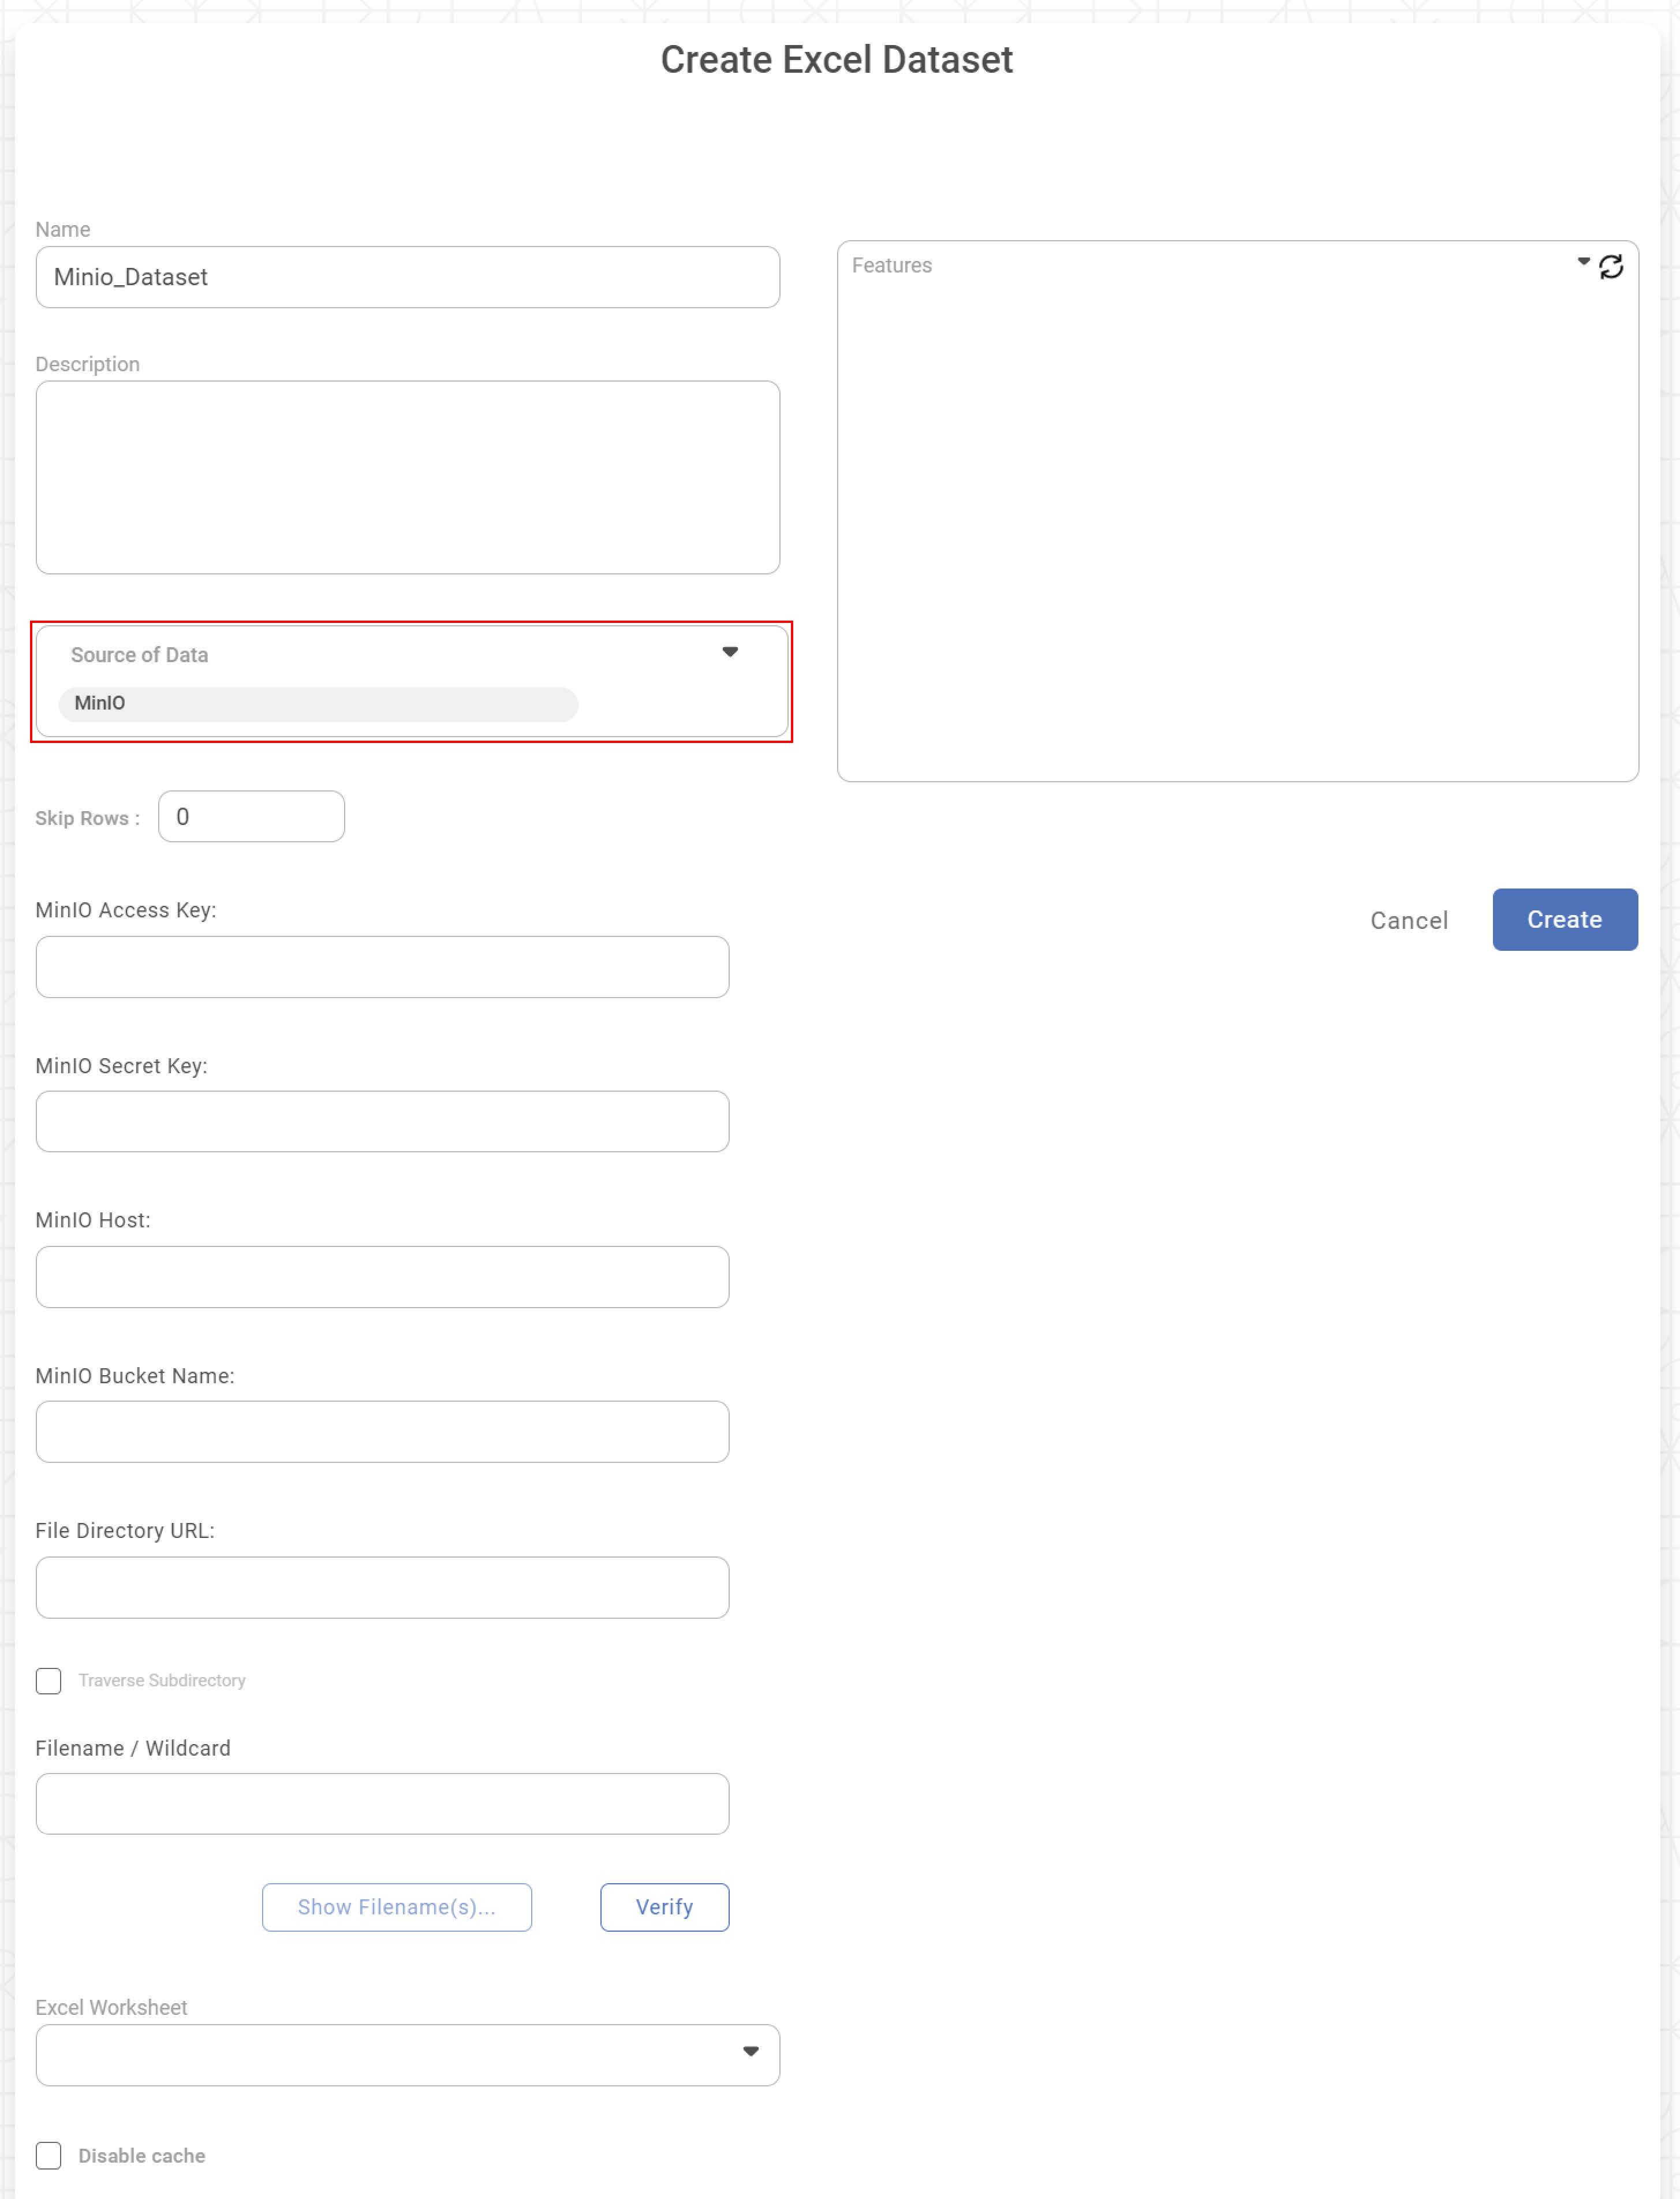
- Enter Name and Description for your dataset.
- To upload the file from MinIO storage, select MinIO in Source of Data dropdown.
A new set of dataset creation options are displayed. - Enter the following details to access the MinIO storage.
- MinIO Access Key:
- MinIO Secret Key:
- MinIO Host:
- MinIO Bucket Name:
- File Directory URL:
- Traverse Subdirectory
Filename / Wildcard:
Notes
- Traverse Subdirectory: Check the box labeled "Traverse Subdirectory" to search for dataset files in all folders and subfolders of the main directory. This option also combines data from the same file stored in different locations containing similar or different records.
- To access specific file, enter "FileName.extenstion". eg: AirPassengers.xlsx
- If you're unsure of the specific file name, use the "*.xlsx" function in the Filename / Wildcard field. This function enables you to view all Excel files within the designated directory.
- Click Verify. After successful verification, Excel Worksheet dropdown displays all the available sheets.
- Select the desired sheet form dropdown. The Features (Columns) in the Excel worksheet are displayed in the Features box.
- Click Create.
A confirmation message is displayed. The Excel dataset is created in the current workspace and is available for use in workbooks, workflows, and dashboards.
Creating CSV Dataset using MinIO
To create an CSV dataset by using MinIO storage, follow the steps given below.
- Follow steps 1 to 3 of Creating CSV Dataset.
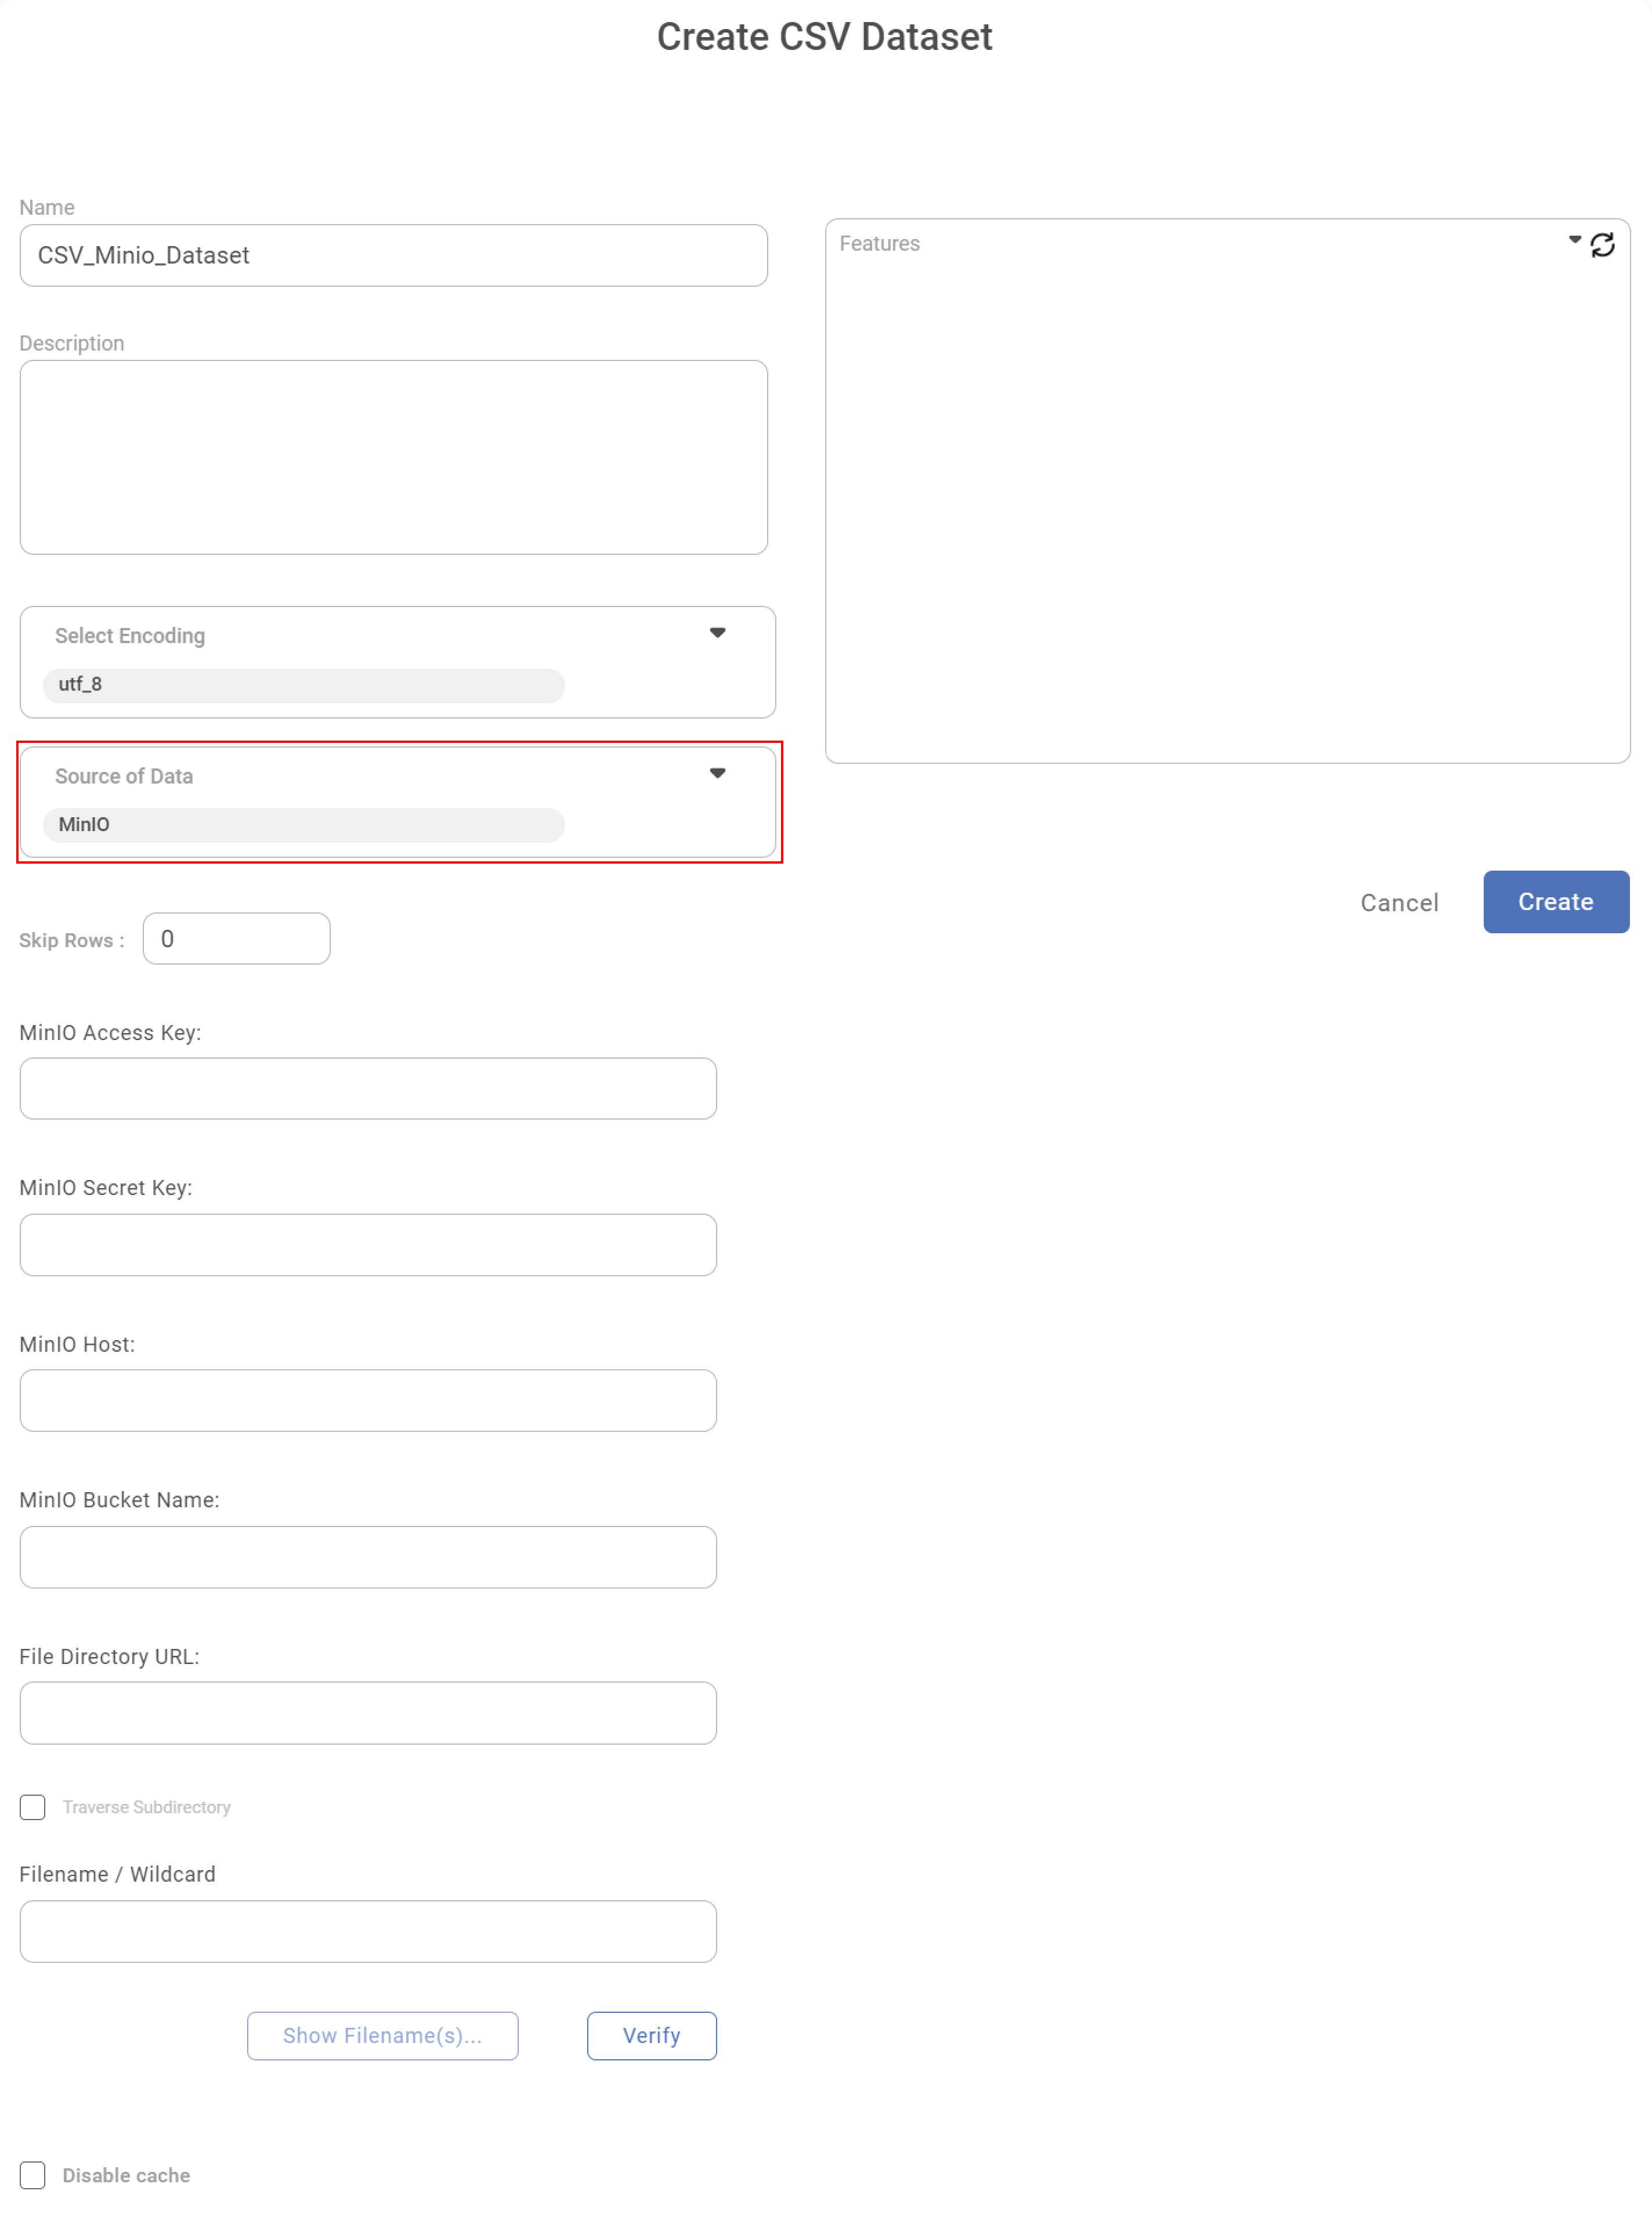
- Enter Name and Description for your dataset.
- Click Select Encoding dropdown to select the desired encoding method. The default encoding method is utf_8.
- To upload the file from MinIO storage, select MinIO in Source of Data dropdown. A new set of dataset creation options are displayed.
- Enter the following details to access the MinIO storage.
- MinIO Access Key:
- MinIO Secret Key:
- MinIO Host:
- MinIO Bucket Name:
- File Directory URL:
Traverse Subdirectory
Notes - Traverse Subdirectory: Check the box labeled "Traverse Subdirectory" to search for dataset files in all folders and subfolders of the main directory. This option also combines data from the same file stored in different locations containing similar or different records.
- To access specific file, enter "FileName.extenstion". eg: AirPassengers.csv
- If you're unsure of the specific file name, use the "*.csv" function in the Filename / Wildcard field. This function enables you to view all csv files within the designated directory.
Filename / Wildcard:
- Click Verify. After successful verification, CSV Worksheet dropdown displays all the available sheets.
- Select the desired sheet form dropdown. The Features (columns) in the csv worksheet are displayed in the Features box.
- Click Create.
A confirmation message is displayed. The CSV dataset is created in the current workspace and is available for use in workbooks, workflows, and dashboards.
Creating Text Dataset using MinIO
To create a Text dataset by using MinIO storage, follow the steps given below.
- Follow steps 1 to 3 of Creating Text Dataset.
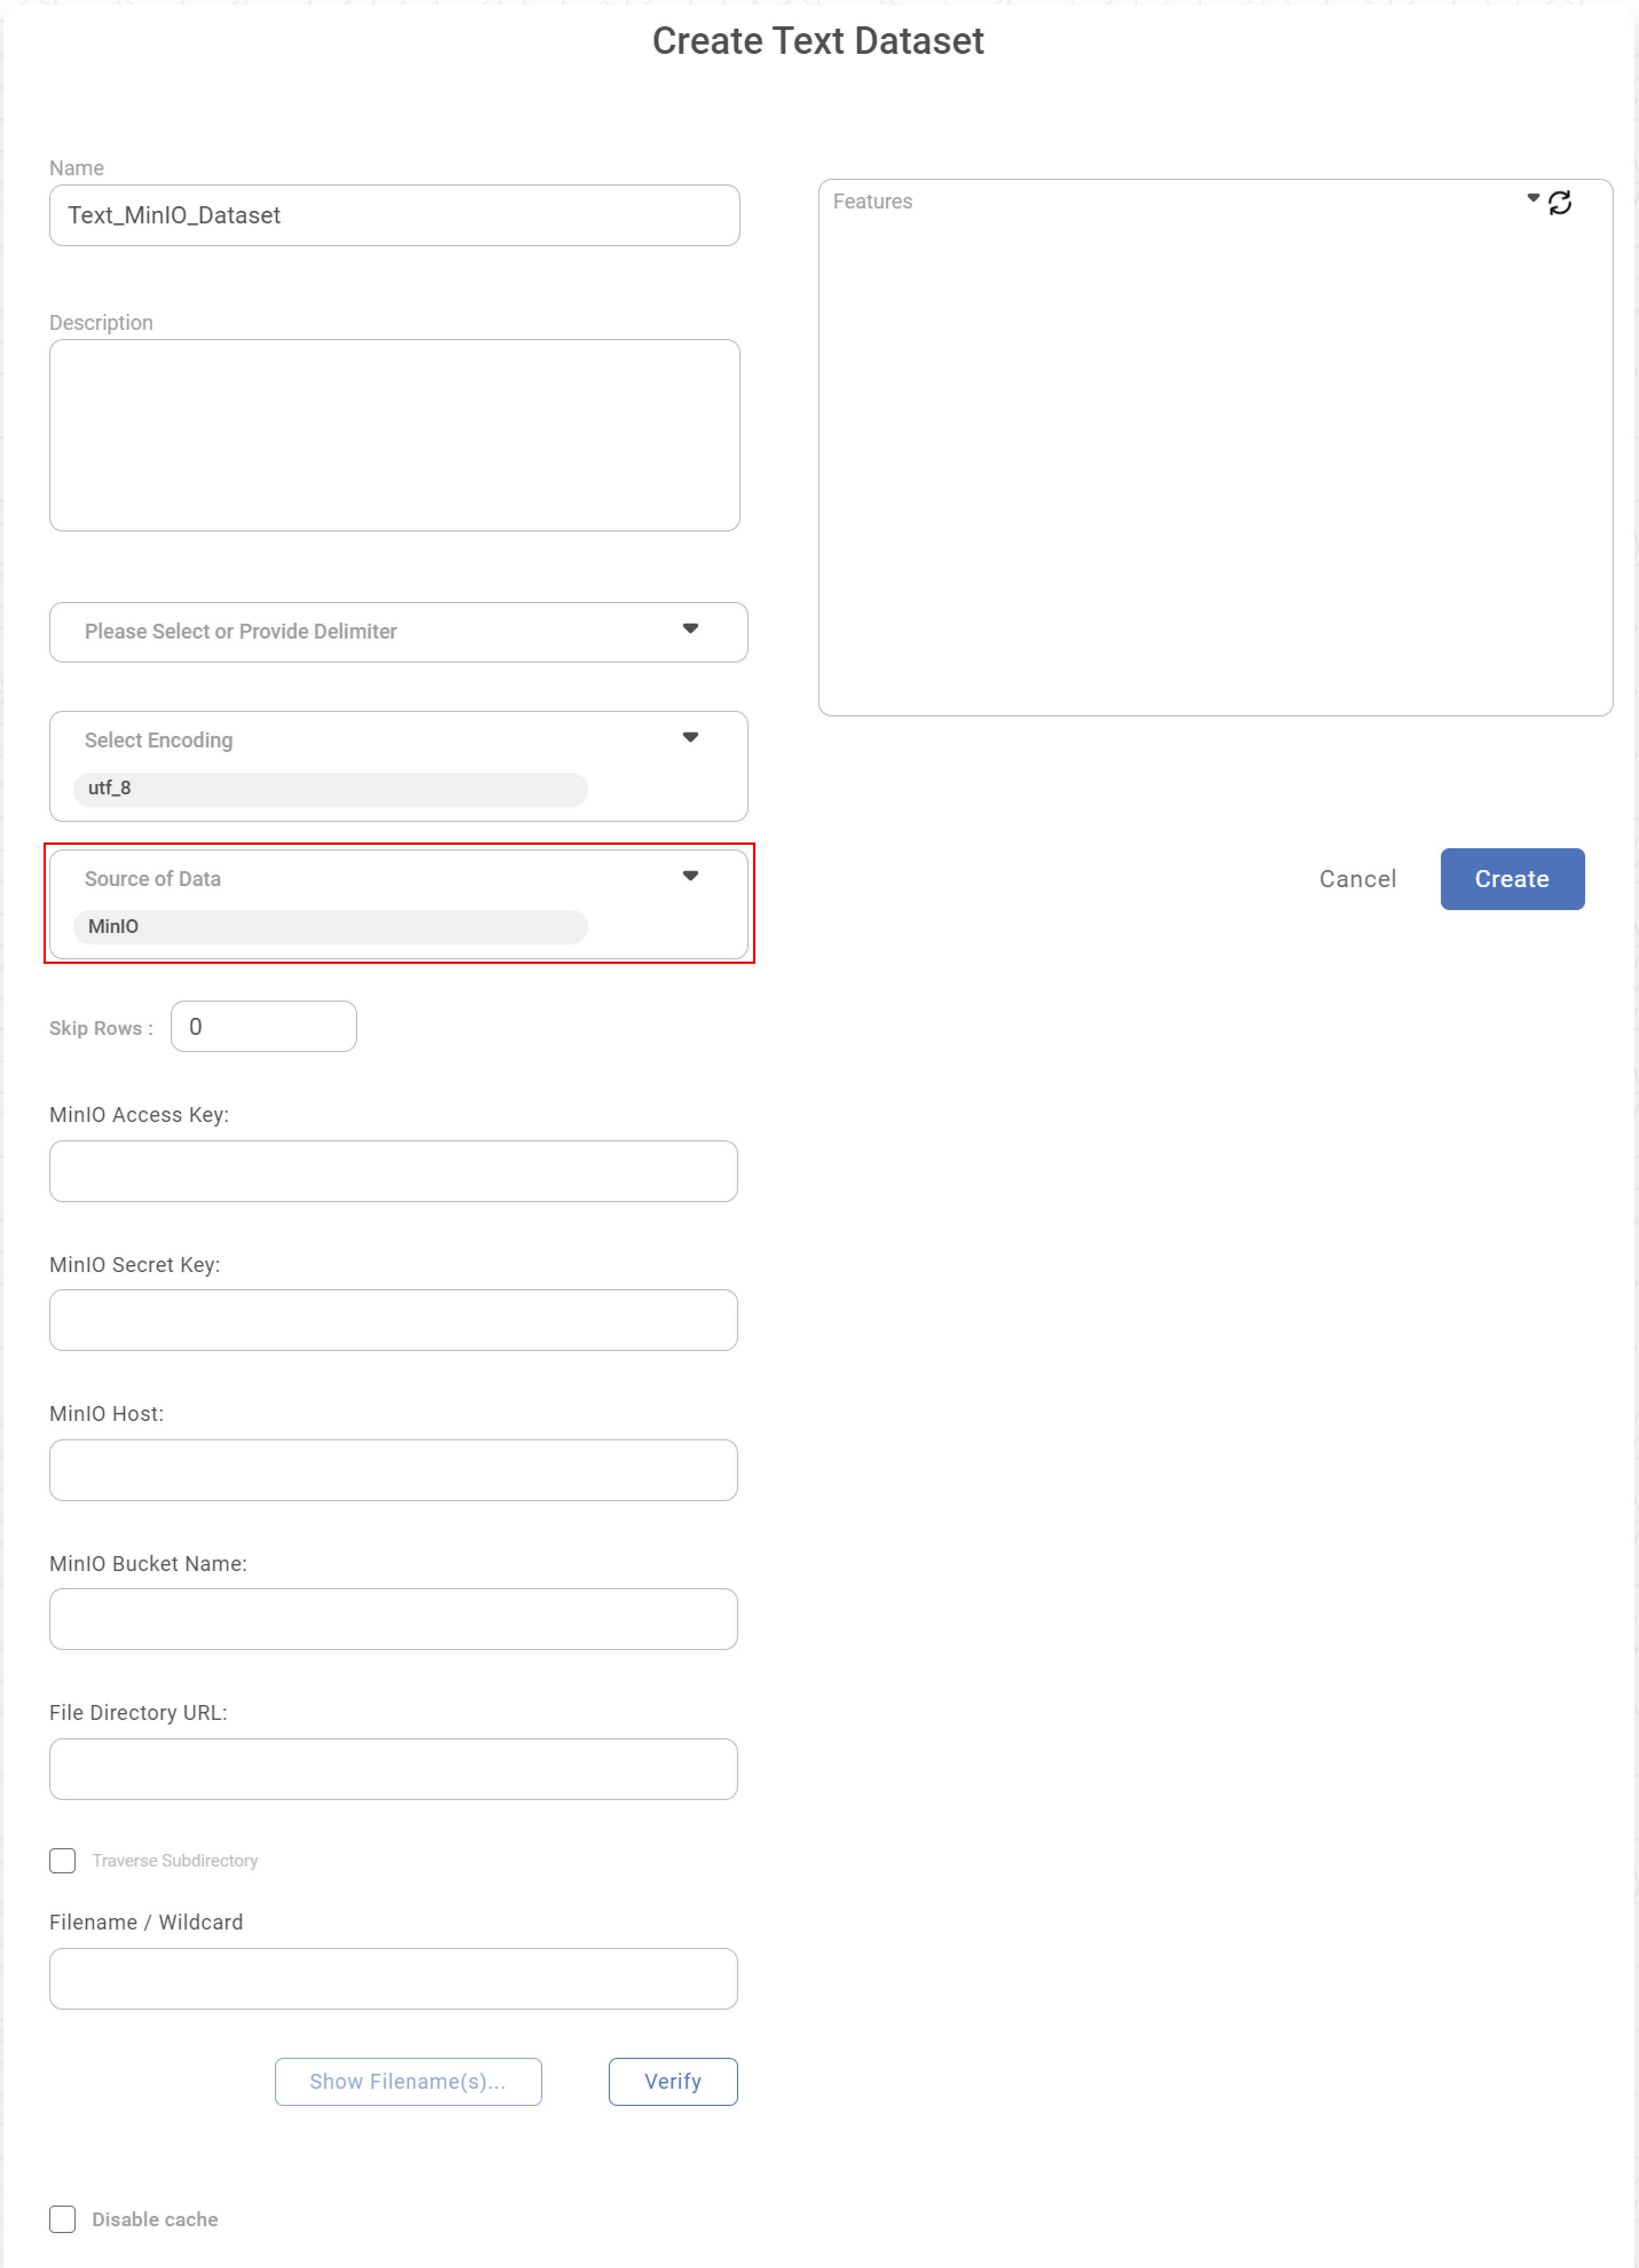
- Enter Name and Description for your dataset.
- Select the Data Delimiter from the drop-down or provide a new delimiter of your choice.
- Click Select Encoding dropdown to select the desired encoding method. The default encoding method is utf_8.
- To upload the file from MinIO storage, select MinIO in Source of Data dropdown. A new set of dataset creation options are displayed.
- Enter the following details to access the MinIO storage.
- MinIO Access Key:
- MinIO Secret Key:
- MinIO Host:
- MinIO Bucket Name:
- File Directory URL:
- Traverse Subdirectory
Filename / Wildcard:
Notes
- Traverse Subdirectory: Check the box labeled "Traverse Subdirectory" to search for dataset files in all folders and subfolders of the main directory. This option also combines data from the same file stored in different locations containing similar or different records.
- To access specific file, enter "FileName.extension". eg: AirPassengers.txt
- If you're unsure of the specific file name, use the "*.txt" function in the Filename / Wildcard field. This function enables you to view all Text files within the designated directory.
- Enter the file name to access specific file.
- Click Verify. After successful verification, 'Show Filename(s)' displays all the available text files.
- The Features (columns) in the text file are displayed in the Features box.
- Click Create.
A confirmation message is displayed. The Text dataset is created in the current workspace and is available for use in workbooks, workflows, and dashboards.
Creating JSON Dataset using MinIO
To create an JSON dataset by using MinIO storage, follow the steps given below.
- Follow steps 1 to 3 of Creating JSON Dataset.
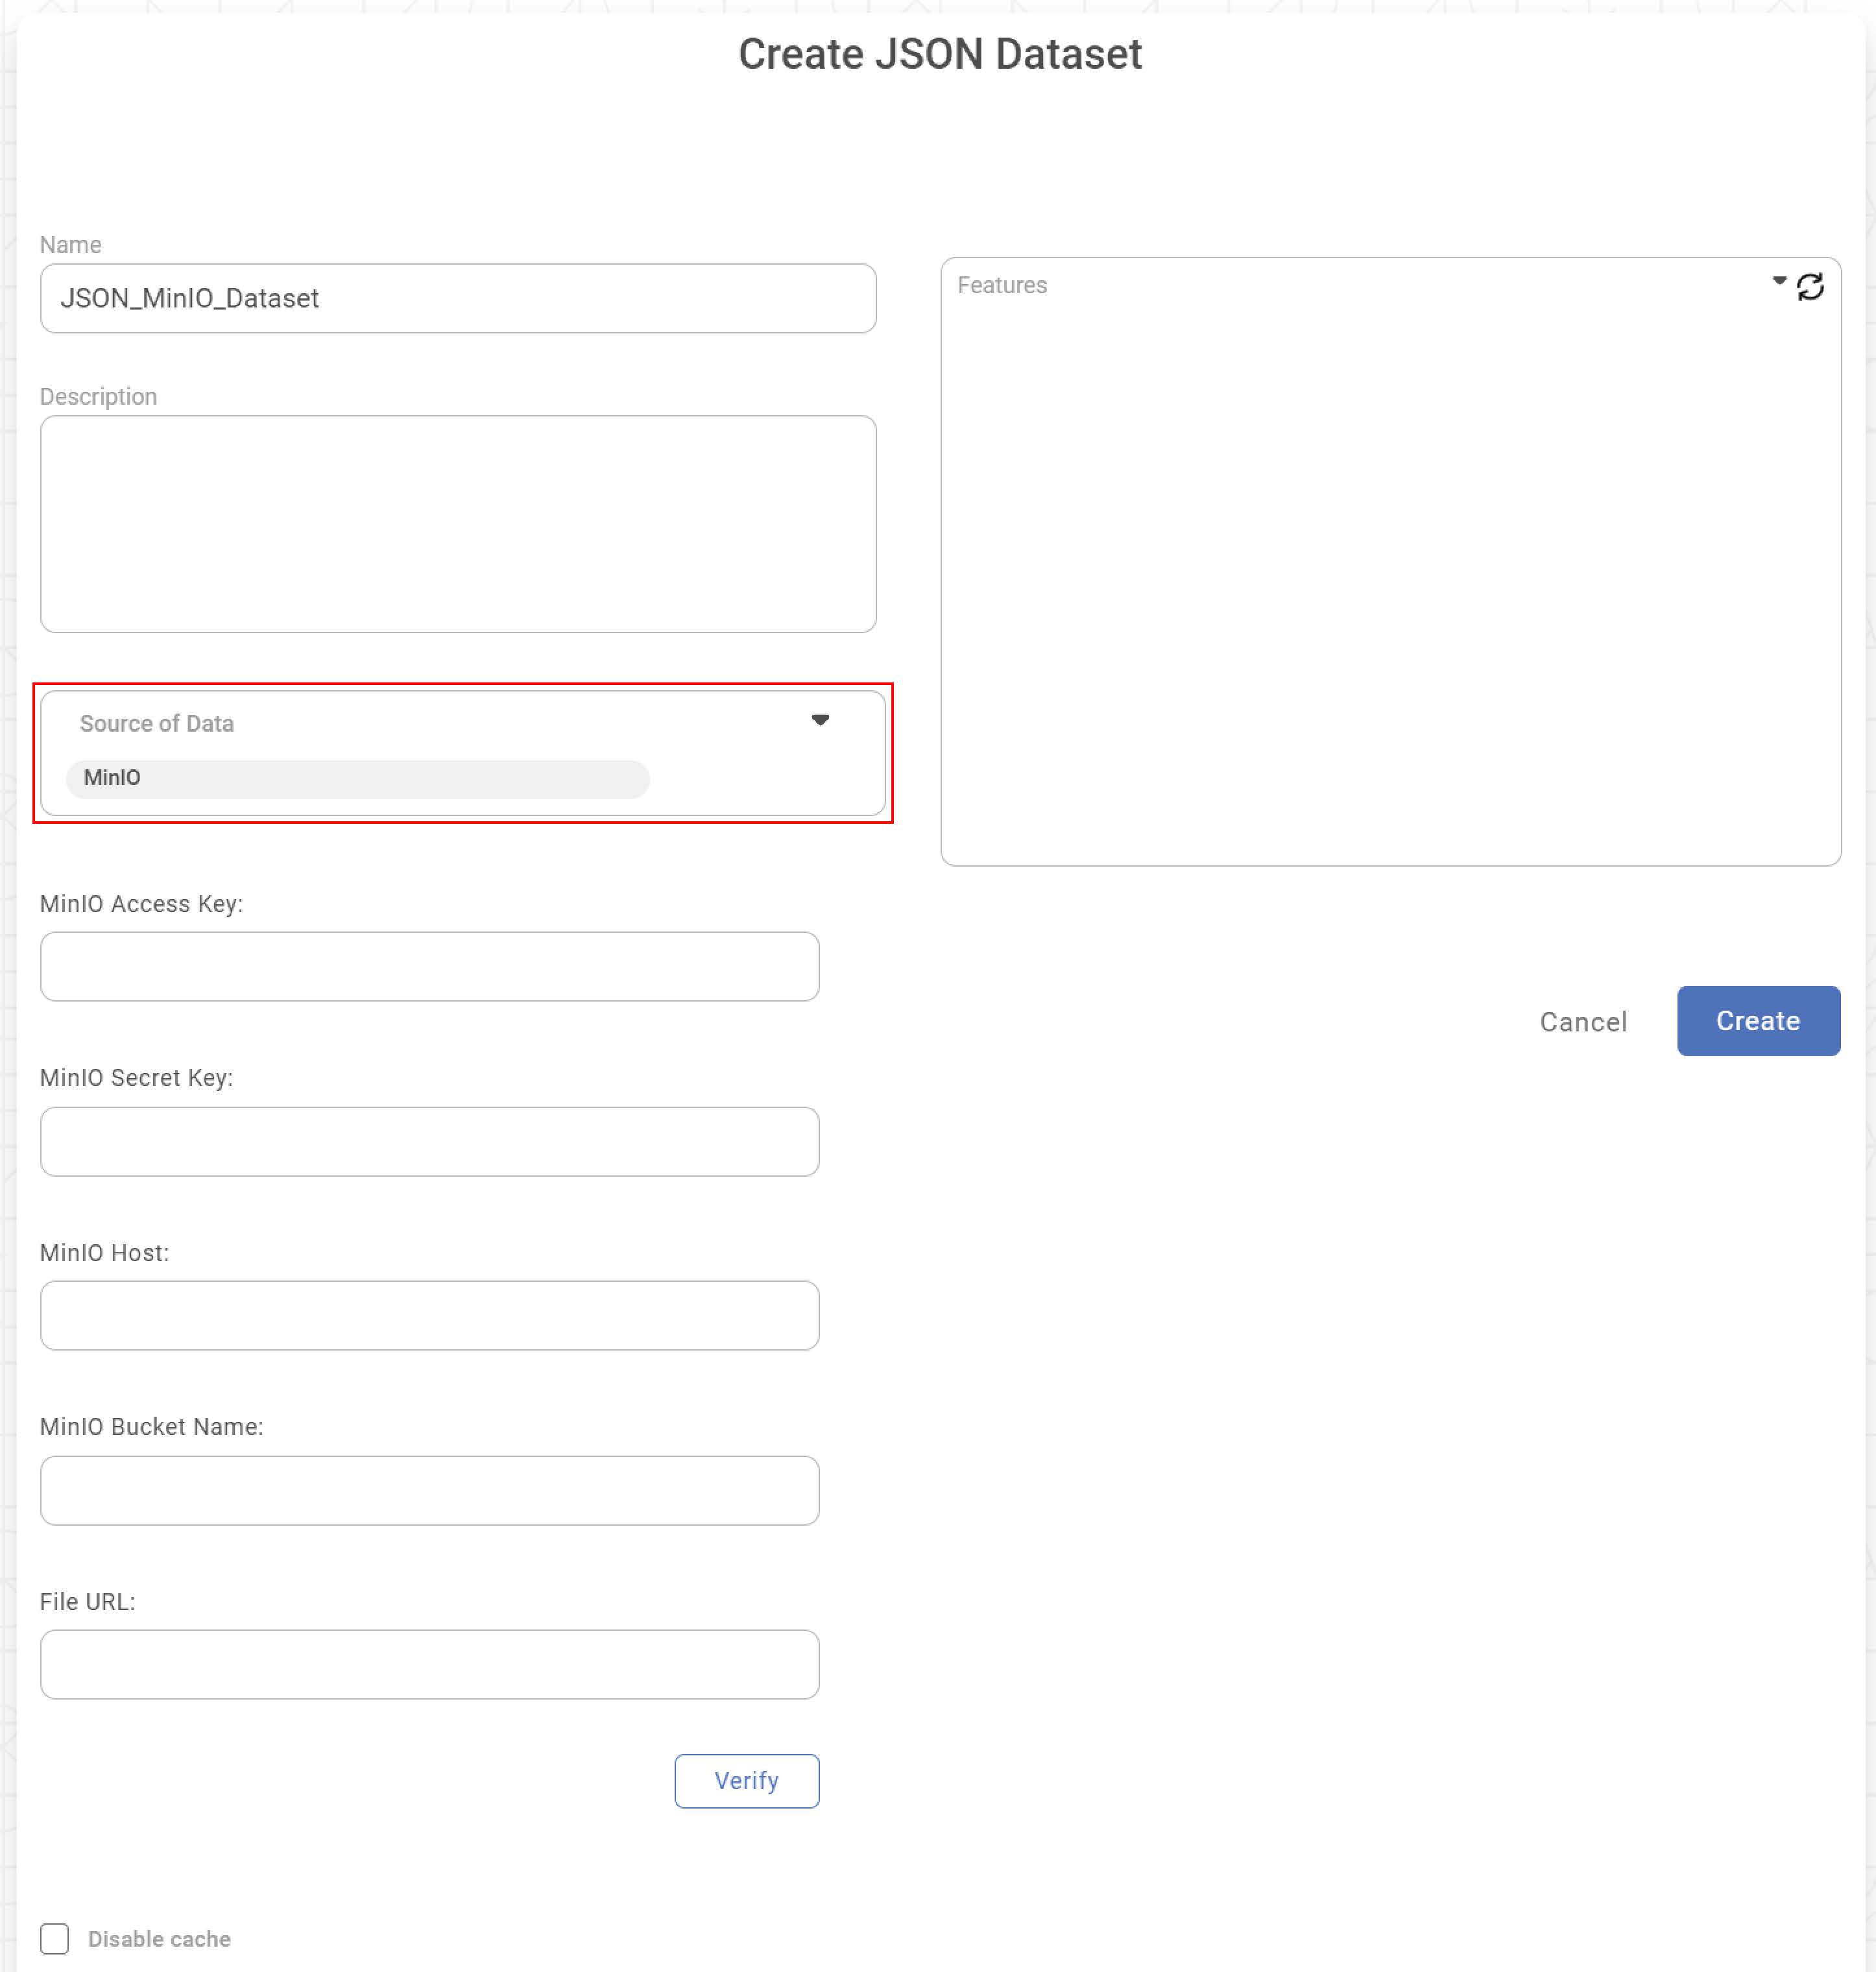
- Enter Name and Description for your dataset.
- To upload the file from MinIO storage, select MinIO in Source of Data dropdown. A new set of dataset creation options are displayed.
- Enter the following details to access the MinIO storage.
- MinIO Access Key:
- MinIO Secret Key:
- MinIO Host:
- MinIO Bucket Name:
- File URL:
- Click Verify. After successful verification, the Features (Columns) in the JSON file are displayed in the Features box.
- Click Create.
A confirmation message is displayed. The JSON dataset is created in the current workspace and is available for use in workbooks, workflows, and dashboards.
Related Articles
Cache
In Rubiscape, the cache settings are at the instance level. Currently, Rubiscape supports six types of caches. You can select any caching method as required. Note Select the cache aligning with storage setting. Example: For Django storage, select the ...Storage Setting
In Rubiscape, the storage settings are at the instance level. Currently, Rubiscape supports five types of storage. You can select any storage as required. Note Only Superadmin can change the storage. Local (default) S3 on AWS MinIO Azure Blob Storage ...Parquet
Creating Parquet Dataset Rubiscape supports Parquet files (.parquet) for dataset creation. To create a Parquet dataset, follow the steps given below. On the home page, click Create icon . The Product Selection page is displayed. Hover over the Data ...