Publishing a Dasboard
You can publish a Dashboard after it is created. Publishing a Dashboard generates a public link for the Dashboard, which can then be shared with the business users.
Publishing a Dashboard facilitates business users to
- Receive the URL and open the Dashboard independently in a new window.
- View all pages within the Dashboard without any login credentials.
- Apply interactivity filter on the Dashboard to visualize data analysis results dynamically.
To publish a Dashboard, follow the steps given below.
- Open the Workspace that includes your Dashboard. Refer to Changing Workspace.
- On the home page, click Dashboards. Recent Dashboards for the selected Workspace are displayed.
- Hover over the Dashboard that you want to publish and click Edit. The Dashboard is displayed in edit mode.
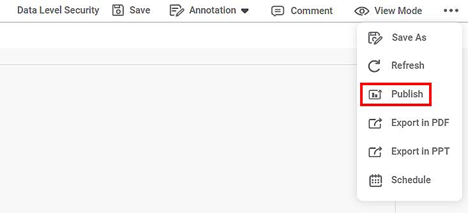
- On the Function Pane, click the ellipsis in the top-right corner.
- From the drop-down list, click Publish.
Publish Dashboard dialog box is displayed. Enter the number of days in the Validity of Dashboard (Enter number of days): field
Notes:- A validation option is provided for validating the Dashboard. This is the validity of the public link generated for the Dashboard.
- Users can enter the validity (number of days) up to 365 days.
- If the number entered by the user is greater than 365, then the user will not be able to generate the link.
Click Generate Link.
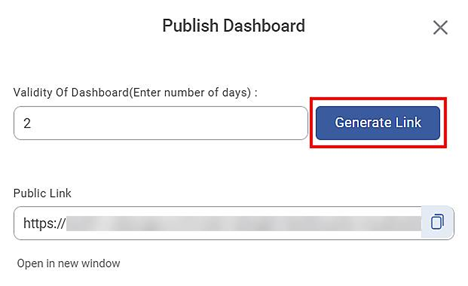
A link is generated in the Public Link field, and the Dashboard is published.
|
|
Related Articles
Publishing Models
You can publish algorithms as models after their successful execution. A model can be reused in a workbook for training and experimenting or can be used in a workflow for production. Notes: This functionality is available only for Machine Learning ...MLOPS - Machine Learning Operations
Introduction: Why Rubiscape MLOps? Rubiscape MLOps provides an end-to-end environment for building, tracking, publishing, and serving machine learning models. It ensures experiment reproducibility, streamlined deployment, and centralized model ...Resuable Rubipython/RubiR Code
Resuable RubiPython/RubiR Code You can publish the RubiPython/RubiR code from a workbook/Pipeline and reuse it in another workbook or pipeline of same project. This feature is similar to publishing models in RubiStudio. Note that same functionality ...Model Validation
Model validation is an enhancement of publishing a model. You can use this feature to explore the result of the published model for a selected dataset. In model validation, you can use the published model for the selected algorithm with the same ...Building Algorithm Flow in a Workflow Canvas
Building algorithm flow in a Workflow Canvas is similar to building algorithm flow in a Workbook Canvas. You can use your trained algorithms here. To build algorithm flow in a Workflow Canvas, refer to Building Algorithm Flow in a Workbook Canvas. ...