RubiPython
Writing Custom Code using RubiPython
- Create your algorithm flow. Refer to Building Algorithm Flow in a Workbook Canvas.
- Drag and drop RubiPython on your workbook canvas.
Notes:
- You can connect multiple predecessor nodes to RubiPython. The output of all the predecessors is available for your use in the RubiPython node.
- If you connect the dataset to RubiPython, the dataset fields are available as input to RubiPython.
- If you connect the algorithm to RubiPython, the columns in the resultant data are available as input to RubiPython.
- Connect required nodes to RubiPython in your algorithm flow.
- Select RubiPython, and in the Properties pane, click Configure.

RubiPython configuration page is displayed.The fields/icons on the RubiPython configuration page are described in the table below.Icon/Field
Description
Available Input Variables
- It displays the features (columns) present in the preceding task’s output. These features are stored in a variable named
inputData, which is of dictionary data type. The Dictionary is a data type that contains name-value pairs.
- You can access the features in the
inputDatavariable and process them to create your custom variables. - You can access all the preceding task names, the features (columns) present in each task, and the index of each row in the task in the
inputDatavariable. - You can access all the preceding task names in the variable named
inputData.keys(), which is of dictionary data type. - You can access all the features (columns) present in a particular preceding task and the index of each row in the
inputData[‘dataset_ name’]variable. - You can access a single feature (column) from the features present in a particular preceding task and the index of each row in the
inputData[‘<dataset_ name>’][‘<column_name>’]variable.
Custom Output Variables
It displays a list of output variables you created. These variables are stored in the form of a Dictionary.
Add Custom Output Variable
- It has 2 values
- Add Custom Output Variable
- Add Multiple Custom Output Variable
- By default, the value is set to Add Custom Output Variable
- Add Custom Output Variable helps you create your custom output variable from the existing variables (Features of the dataset). Refer to Creating Custom Output Variable.
- Add Multiple Custom Output Variable helps you create multiple custom output variables from the existing variables (Features of the dataset). Refer to Creating Multiple Custom Output Variables.
Clear Output Variables
It clears the created output variables.
Refresh Output Variables It refreshes the created output variables. Definite Option Output Variable
- If selected, only the Custom Output Variables are passed on to the successor node.
- If multiple predecessors are connected to the RubiPython component, this flag is false (not selected) by default. You can select it as per your requirements.
Input Carry Forward Flag
- If selected, the variables received as input from RubiPython’s predecessor tasks are passed on to the successor task, not otherwise.
Note: This is possible only when a single predecessor is connected to RubiPython, not when multiple predecessors are connected to RubiPython. - This flag is disabled when multiple predecessors are connected to RubiPython. So, the input variables do not appear on the Data page when you explore RubiPython.
- Upon exploring RubiPython, you can view the custom output variables for RubiPython in its Data page if you have created the variables.
Input Same As Output
- If selected, the input to the RubiPython node is passed on to the successor task; not otherwise.
- If multiple predecessors are connected to the RubiPython component, this flag is false (not selected) by default. You can select it as per your requirements.
Python Code Editor
The Python Code Editor helps you to add your customized Python code. Refer to Using Python Code Editor.
Minimap - It is a small, scaled version of code editor window.
- If selected, shows the overview of entire code area in top right corner of code editor window.
Theme - It helps you to customize the code editor theme.
- Following theme options are provided:
- VS-Dark
- VS-Light
- High Contrast-Dark
- High Contrast-Light

It helps you to maximize the Code Editor page.

It saves the changes, closes the configuration page, and returns you to the workbook canvas.
- It displays the features (columns) present in the preceding task’s output. These features are stored in a variable named
- Write your Python code in the Python Code Editor. Refer to Using Python Code Editor.
- After completing, click Save.
- To execute the code, Run the RubiPython node.
After successful execution, a confirmation message is displayed. You can view the output of the custom component under View Log > Custom Component Log.
Using RubiPython Code Editor
In the Python Code Editor, you can add your Python code.
- The input variables are stored in the form of a Dictionary data type inputData.
- Similarly, newly created variables are stored in another Dictionary type variable output.
- To use new variables in your code, you first need to create them. Refer to Creating Custom Output Variable.
- To print to the console, use
print2log(). - You can use variables declared at the workbook/workflow level in your Python code. Refer to Using Variables in RubiPython.
A sample Python code is shown in the image below.
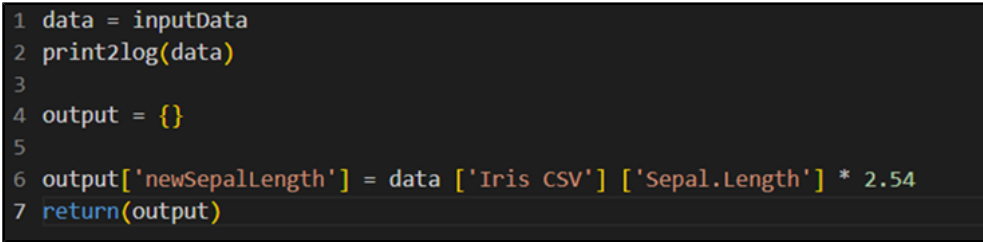
The table below explains the above code snippet.
Line of Code | Result |
| It creates a copy of |
| It prints the contents of |
| It creates a new variable named ‘output’ of type dictionary. |
| It assigns the value of Sepal.Length of Iris CSV dataset multiplied by 2.54 to column |
Notes: |
|
A sample Python code to access predecessor tasks is shown in the image below.
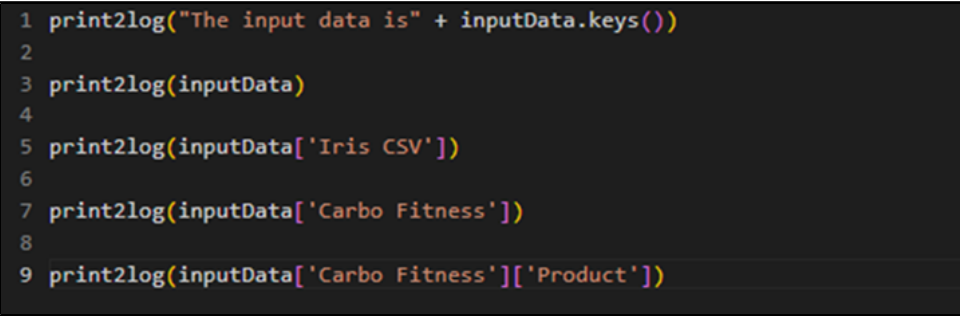
The table below explains the above code snippet.
Line of Code | Result |
| It prints all the predecessor task names referenced by inputData to the console log or custom component log as a dictionary. |
| It prints the contents (predecessor task names, column names, and index) of inputData to the console log or custom component log. |
| It prints the contents (column names and index) of the predecessor task to the console log or custom component log. |
| It prints the contents (column name and index) of a particular column of the predecessor task to the console log or custom component log. |
Creating Custom Output Variable
To create custom variable in your RubiPython code, follow the steps given below.
- On the RubiPython page, click Add Custom Output Variable.
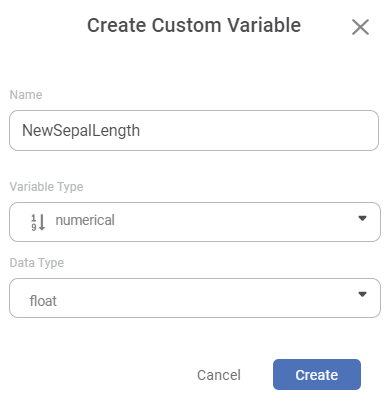
Create Custom Variable page is displayed. - Enter a Name for your output variable.
Select the type of your output variable from the Variable Type drop-down. The options are Categorical, Numerical, Interval, and Textual.
Note:
Ensure the data type of the newly created output variable matches the data type of the corresponding input variable. If the variable types do not match, the application gives an error when running the algorithm flow. - Select data type of the output variable from the Data Type drop-down. The options are Integer, Textual, Float, and Boolean.
- Click Create.
The output variable is created and is added to the Custom Output Variables list.
Creating Multiple Custom Output Variables
You can create multiple custom output variables by providing a JSON string.
To create multiple custom output variables in your RubiPython code, follow the steps given below.
- On the RubiPython configuration page, click Add Multiple Custom Output Variable.
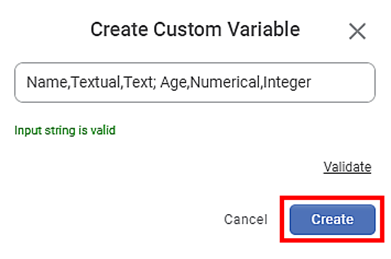
Create Custom Variable page is displayed. Enter JSON strings in the following format –
<Variable1 Name>, <Variable Type>, <Data Type>; <Variable2 Name>, <Variable Type>, <Data Type>; …<VariableN Name>, <Variable Type>, <Data Type>.Note:
Individual elements of the string should be separated by comma (,) and the strings should be separated by a semicolon (;).
For example, to add the variables Name and Age of type Text and Integer respectively, the string would be – Name, Textual, Textual; Age, Numerical, Integer.
Click Validate to validate the string.

If the string is valid, a confirmation message is displayed. If the string is invalid, the application gives an error message. You can rectify the errors and try again.
After you make sure the string is valid, Click Create.
The specified output variables are created and are added to the Custom Output Variables list.
Notes: |
|
Related Articles
RubiPython
Writing Custom Code using RubiPython To write your custom code using RubiPython, follow the steps given below. Create your algorithm flow. Refer to Building Algorithm Flow in a Workbook Canvas. Drag and drop RubiPython on your workbook canvas. Notes: ...Using Variables in RubiPython
The variables defined at the workbook/pipeline level can be used in the RubiPython custom component. To use a user-defined variable in RubiPython, follow the steps given below. Create your algorithm flow. Refer to Building Algorithm Flow in a ...Resuable Rubipython/RubiR Code
Resuable RubiPython/RubiR Code You can publish the RubiPython/RubiR code from a workbook/Pipeline and reuse it in another workbook or pipeline of same project. This feature is similar to publishing models in RubiStudio. Note that same functionality ...Custom Functions in RubiPython
Reading Data from File A sample Python code to read data from file is shown in the image below. The table below explains the above code snippet. Line of Code Result getReaderData(“datasetName”,“subdatasetName”) This custom function checks the type of ...Custom Functions in RubiPython
Reading Data from File A sample Python code to read data from file is shown in the image below. The table below explains the above code snippet. Line of Code Result getReaderData(“datasetName”,“subdatasetName”) This custom function checks the type of ...