Custom Functions in RubiPython
Reading Data from File

The table below explains the above code snippet.
Line of Code | Result |
| This custom function checks the type of the dataset (Excel, CSV, and Text) and accordingly reads the dataset and returns it as an output of the function of dictionary type. |
| Prints the Reader output data as a dictionary to the console log or custom component log. |
Note: | In the |
Writing Data to File
A sample Python code to write data to file is shown in the image below.

In the above code, the writeDataToFile custom function is used to append a row to the selected Carbo Fitness file (dataset).
dataToWritestores the output data of the type dictionary to write to a file.writeDataToFile(dataToWrite,“action”,“delimiter”,“datasetName”)custom function appends or overwrites the output data to the selected file (Excel, CSV, or Text datasets).
The table below describes the writeDataToFile function and parameters.
Function | Parameter | Remarks |
|
| — |
| It is of type String, and values can be overwrite and append. | |
| It is of type String, and values can be – “,” / “|” / “ ” / “ ” (comma, pipe, tab, and space). | |
| It is of type String. |
Another example of reading and writing to a file is shown below.

Reading Data from Table
You can use getReaderData to read the data from RDBMS Table.

In the above code,
getReaderData(“datasetName”,“subdatasetName”)custom function checks the type of the dataset and accordingly reads the dataset from the Reader and returns it as an output of the function of type dictionary.print2log(dataToWrite)prints the output data as dictionary to the console log or custom component log.Note:
In the getReaderDatacustom function, the dataset and the sub-dataset names are the same for all datasets except for RDBMS datasets. In case of RDBMS datasets, sub-dataset name is the name of the table added in the RDBMS dataset.
Writing Data to Table
Similarly, you can use writeDataToTable to write the data into RDBMS Table.

The table below describes the writeDataToTable function and parameters.
Function | Parameters | Remarks |
|
| — |
|
| |
| It is of type String. | |
| It is of type String. | |
|
| |
|
|
Notes: |
|
Uploading File to Cloud Storage
RubiPython provides a custom function to upload files to S3 server. The code syntax to upload a file to cloud storage is shown below.
|
Downloading File from Cloud Storage
RubiPython provides a custom function to download files stored on S3 server. The code syntax to download a file from cloud storage is shown below.
|
If the downloaded file is a CSV, you can use the below syntax to read the contents of the downloaded file.
|
Creating Connection with Database
The "getConnectionObject" is a custom function in RubiPython. It allows access to the database without attaching the reader node to the RubiPython. It provides the single encrypted connection object in all python scripts.
To get the connection with the database, follow the steps given below.
Notes |
|
A sample Python code to make the connection to the database is shown below.
The table below explains the above code snippet.
Line of Code | Result |
import pandas as pd | Imports the Pandas library into the current Python script or and assigns it the alias "pd" |
conn = getConnectionObject("SalePy") | It creates a connection to a "SalePy" dataset. |
query = 'SELECT * FROM public."SaleData" ' | It holds a SQL query, which selects all columns ( * ) from a table named "SaleData" in the "public" schema. |
df = pd.read_sql(query, con=conn) | Uses the pd.read_sql() function from the pandas library to execute the SQL query and retrieve data into a DataFrame. |
print2log(df.head(10)) | Prints the first 10 rows of the DataFrame 'df' to the log. |
In addition to the functionality, you have the capability to Insert, Update, or Delete the row within an existing dataset. For more info, refer the sample code snippets.
Adding a row
Deleting a row.
Updating a Row
Using Variables in RubiPython
The variables defined at the workbook/workflow level can be used in the RubiPython custom component.
To use a user-defined variable in RubiPython, follow the steps given below.
- Create your algorithm flow. Refer to Building Algorithm Flow in a Workbook Canvas.
- Drag and drop RubiPython on your workbook canvas.
- If required, connect other nodes to the RubiPython node in your algorithm flow.
- Select RubiPython and in the Properties pane, click Configure.
The configuration page is displayed. - Write the code in the RubiPython Code Editor. Refer to Writing Custom Code using RubiPython.
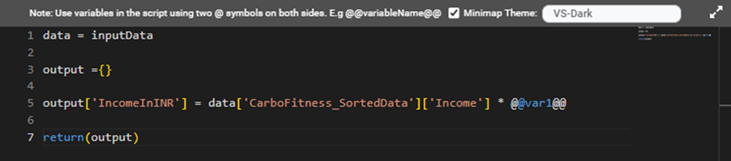
- To use a workbook/workflow level variable in the code statements, use @@ symbols before and after the variable name.
For example, if the variable name is var1, you can use it in RubiPython as @@var1@@.
A sample RubiPython code containing a user-defined variable is shown in the figure below.
Publishing RubiPython Code
You can publish the RubiPython code from a workbook and reuse it in another workbook or workflow. This feature is similar to publishing models in RubiStudio.
To publish RubiPython code, follow the steps given below.
- Write the RubiPython code as required. Refer to Writing Custom Code using RubiPython.
- Run the RubiPython node.
- After the node is successfully executed, select the node, click the vertical ellipsis ( ), and click Publish code.
After the code is successfully published, a confirmation message is displayed. This code is listed under Reusable Codes on the Rubiscape Home page.
Notes: |
|
Reusing RubiPython Code
The published RubiPython code is available for reuse in workbooks and workflows in the same workspace.
To reuse a published code, follow the steps given below.
- Open the workbook or create a workbook. Refer to Opening a Workbook and Creating a Workbook.
- Click Reusable Codes under Code Fusion in rubistudio in the Task Pane.
The available reusable codes are displayed as shown in the figure below.
- Double-click or drag-and-drop the node on the workbook canvas.
- To run the code, select the node, click the vertical ellipsis (), and click Run.
After the node executes successfully, a confirmation message is displayed.
Custom Function to Access File from Rubiscape File Server
Using the 'getFileFromServer' custom function, you can now read data from a file on the Rubiscape File Server and access it directly in the RubiPython and RubiNotebook node without creating a dataset.
A sample code snippet to get the file from server in RubiPython is provided below:
Line of Code | Result |
a = getFileFromServer("/Bank.xlsx") | 'getFileFromServer' is a function, which retrives the file 'Bank.xlsx' from the rubiscape file server and assigns it o variable 'a'. |
import pandas as pd | Imports 'pandas' libraries in python for data manipulation and ;BytesIO' from 'IO' to handle binary data. |
data = BytesIO(a.getvalue()) | In this line creates an in-memory binary stream using BytesIO from the binary content of a. The getvalue() method is called on a to retrieve the binary content. |
df = pd.read_excel(data) | Reads the excel file from the 'data' and streams into pandas dataframe. |
print2log(df.head(5)) | Prints the first five rows of the DataFrame df to the log using a custom function print2log(). |
return df | Returns the DataFrame df, which contains the data from the Excel file. |
After successfully running the RubiPython node, the output variables from the data will be available in the Custom Output Variables.
Similarly, a sample code snippet to get the file from server in RubiNotebook is provided below:
Custom Email Function to Send Email from Pipeline
Function:
sendEmailFunction(listEmails, subject, body)
- The arguments can be defined as -
- After execution of Rubipython Node, the email is sent to the email ids as defined in the list as direct recipients.
- The email is sent from the sender as defined in the Administrator section under SMTP credentials in Settings section.
Related Articles
Custom Functions in RubiPython
Reading Data from File A sample Python code to read data from file is shown in the image below. The table below explains the above code snippet. Line of Code Result getReaderData(“datasetName”,“subdatasetName”) This custom function checks the type of ...RubiPython
Writing Custom Code using RubiPython Rubipython Task is available in Pro Code in TaskPane options of Workbook and Pipeline. Below mentioned functionality is available in Workbook as well as Pipeline. To write your custom code using RubiPython, follow ...RubiPython
Writing Custom Code using RubiPython To write your custom code using RubiPython, follow the steps given below. Create your algorithm flow. Refer to Building Algorithm Flow in a Workbook Canvas. Drag and drop RubiPython on your workbook canvas. Notes: ...Using Variables in RubiPython
The variables defined at the workbook/pipeline level can be used in the RubiPython custom component. To use a user-defined variable in RubiPython, follow the steps given below. Create your algorithm flow. Refer to Building Algorithm Flow in a ...Resuable Rubipython/RubiR Code
Resuable RubiPython/RubiR Code You can publish the RubiPython/RubiR code from a workbook/Pipeline and reuse it in another workbook or pipeline of same project. This feature is similar to publishing models in RubiStudio. Note that same functionality ...